User Documentation 👩
Contents
- Installing ibus-typing-booster
- Adding ibus-typing-booster to your desktop
- Setup
- Key and Mouse bindings
- Multilingual input
- Compose support (About dead keys and the Compose key)
- “Dead keys”
- The “Compose” key
- Customizing compose sequences
- Special “Compose” features in Typing Booster
- Unicode symbols and emoji predictions
- The Gnome on-screen keyboard, enabling and using it
- Using NLTK to find related words
- Speech recognition
- ⚠️🚧🏗️ AI chat using ollama or ramalama
Installing ibus-typing-booster
For most distributions, there are binary packages available already. Here are some examples for common distributions how you can install ibus-typing-booster (and optionally emoji-picker) using package managers on the command line:
- Fedora:
sudo dnf install ibus-typing-boostersudo dnf install emoji-picker(optional)
- Debian, Ubuntu:
sudo apt-get install ibus-typing-booster(includes emoji-picker already! 😁)
- openSUSE:
sudo zypper install ibus-typing-booster(includes emoji-picker already! 😁)
If your distribution has no binary packages, or you want the bleeding edge version and prefer to install from source, please refer to the Developer Documentation. There, you can also find information on how to report bugs or translate the user interface into your language.
Some distributions also have graphical tools to install software (“Gnome Software”, “Ubuntu Software”, …). The following video demonstrates how to install ibus-typing-booster and emoji-picker on Ubuntu 21.04 using “Ubuntu Software”. While “Ubuntu Software” lists ibus-typing-booster and emoji-picker as separate entries, installing ibus-typing-booster also installs emoji-picker. “Ubuntu Software” may not recognize this, still allowing you to click “Install” for emoji-picker, but since it’s already present, the installation completes immediately 😀.
Note: when using Gnome, remember to log out of your desktop and
log in again after installation! On most desktops (including newer
Gnome desktops) one can avoid this by calling ibus restart from the
command line, but on older Gnome desktops, a full logout and login are
necessary; otherwise, ibus-typing-booster will not appear when you try
to add it in the desktop
settings.
Adding ibus-typing-booster to your desktop
This section assumes that you have already installed ibus-typing-booster either using binary packages or from source and now want to add an ibus-typing-booster input method to your desktop.
The procedure to add an ibus-typing-booster input method differs slightly depending on which type of desktop you use, the following sections show the procedure for popular desktop choices.
When using the Gnome3 desktop
This video shows how to add ibus-typing-booster to recent Gnome3 desktops, using Gnome3 on Fedora 34 in this example. In older versions of Gnome3, the input method setup was in the “Region & Language” settings instead of in the “Keyboard” settings, for example Ubuntu 21.04 has such an older version of Gnome.
First click on the panel menu in the top right corner of the desktop and then click on the “screwdriver and wrench” icon to open the Gnome3 control center.
Now the Gnome3 control center has opened. Click on the icon for the “Keyboard” settings.
At the bottom you see a list of input sources which have already been added to the desktop before. In this case there are already: “English (US, with euro on 5)” and “Japanese (Kana Kanji)”. This is just an example of course, the list of already added input methods could look different for you. The first entry, “English (US, with euro on 5)”, is not really an input engine, it is just a keyboard layout. One can see that an entry in the list of input sources is a keyboard layout if it does not have the icon showing two tooth-wheels at the right side.
It is recommended to use a keyboard layout with ibus-typing-booster which has a real “AltGr” key and does not just make the “AltGr” or “Alt” key on the right side of the space bar basically a duplicate of the left “Alt” key. For details, see The “AltGr” key.
The second entry, “Japanese (Kana Kanji)” is not just a keyboard layout, it is an input engine to type Japanese.
Now click on the “+” button at the lower left to add another input source.
Then click on the three vertical dots “⋮” to open the search entry field.
Type the word “booster” into the search entry field. Only “Other” remains. ibus-typing-booster supports many languages, even at the same time. Therefore it is not listed under any specific language but under “Other”.
Click on “Other” and you should find an input method named “Other (Typing Booster)” there. There maybe lots of other input methods shown there, depending on what is installed on your system, but if you have ibus-typing-booster installed, “Other (Typing Booster)” should show up there.
Select “Other (Typing Booster)” and click the “Add” button at the top right.
(Note: If you just installed ibus-typing-booster while your current gnome session was still running, you will not find ibus-typing-booster yet. In that case you need to restart your gnome session in order to make newly installed input methods appear in the gnome setup.)
Now you you see the ibus-typing-booster engine listed in the “Keyboard” dialogue of Gnome3.
At the right side of the entry “Other (Typing Booster)” there are three vertical dots “⋮”. If you click on these, a menu opens. One of the entries in that menu is “Preferences”. Clicking that opens the setup tool of the ibus-typing-booster engine.
Now open some programs where you could type something, for example “gedit” or “gnome-terminal”. And activate the ibus-typing-booster engine you want to use in the input source menu of the Gnome panel as shown in this screenshot.
When the input source menu of the Gnome panel is open and an ibus-typing-booster engine is selected, there is a menu entry “Setup” which is an quicker way to open the setup tool than going to the “Region & Language” settings dialogue.
Some options are also directly available in the input source menu of the gnome panel to have quicker access to these often used options than having to open the setup tool. There are also key and mouse bindings for these frequently used options which are shown in the input source menu of the gnome panel as well as a reminder.
Now type something, for example into gedit and you should see some suggestions for completions.
At the beginning, the suggestions only come from the hunspell dictionaries and are thus not very good yet. But ibus-typing-booster learns from your typing, it remembers which words you use often in which context. Therefore, the suggestions become much better over time.
To switch between ibus-typing-booster and other input methods or a simple keyboard layout, you can use the input sources menu in the Gnome panel or the keyboard shortcut, which is Super+Space by default (can be changed in the gnome-control-center).
When using older Gnome3 desktops like in Ubuntu 21.04
This video shows how to add ibus-typing-booster to older Gnome3 desktops like for example in Ubuntu 21.04 where the input method setup was still in the “Region & Language” settings instead of in the “Keyboard” settings. For adding ibus-typing-booster in newer versions of Gnome look here.
When using other desktops than Gnome3
This chapter shows how to add the ibus-typing-booster input method on most desktops except Gnome3 and Unity. The screenshots in this chapter are using XFCE on Fedora 34, but it is the same procedure on most other desktops and window managers as well, only Gnome3 and Unity are a bit special.
First start the
ibus-setupprogram (For example by typingibus-setup &into a terminal.If
ibus-daemonis not yet running,ibus-setupmay ask whether you want to start it. In that case click on “Yes”.If
ibus-daemonwas not already running, you probably also want to make it run automatically every time when you log into your desktop. If you are using Fedora you can do that for most desktops and window managers usingimsettings-switchlike this:imsettings-switch ibus. Or use the graphical toolim-chooserand select to use Ibus.This will change some settings so that when you log in next time,
ibus-daemonwill be running and the following environment variables will be set:export QT_IM_MODULE=ibusexport XMODIFIERS=@im=ibusexport GTK_IM_MODULE=ibusIf you don’t use Fedora and do not have the
imsettings-switch, there may be some other way to startibus-daemonon your system automatically and to set the above environment variables.Or you can put the above environment variables into your
~/.bashrcfile and startibus-daemonfrom some X11 startup file or make your windowmanager start it. I am using the “i3” windowmanager at the moment and have added the lineexec ibus-daemon -drxto my~/.config/i3/configfile.In the “General” tab of
ibus-setupyou see that the default shortcut key to switch between input methods is “Super+Space” and you can change this and some other options if you like.Personally I like the extra property panel. Therefore, I set the “Show property panel” option to “Always” here.
You probably also want the option “Show icon on system tray” switched on.
And I usually choose a somewhat bigger font to be able to see the details in the emoji better.
Now use the “Input Method” tab of
ibus-setupto add the ibus-typing-booster engine.You see a list of input sources which have already been added to the desktop before. In this case there are already: “English - English (US, euro on 5)” and “Japanese - Anthy”. This is just an example of course, the list of already added input methods could look different for you. The first entry, “English - English (US, euro on 5)”, is not really an input engine, it is just a keyboard layout.
It is recommended to use a keyboard layout with ibus-typing-booster which has a real “AltGr” key and does not just make the “AltGr” or “Alt” key on the right side of the space bar basically a duplicate of the left “Alt” key. For details, see The “AltGr” key. By the way, in the “Advanced” tab of
ibus-setupthere is an option “Use system keyboard layout”, if this option is selected, ibus-typing-booster will always use the system keyboard layout, otherwise it will use the keyboard layout from the list of input methods which was used last before switching to ibus-typing-booster.The second entry which is already there in the list of input methods, “Japanese (Kana Kanji)”, is a real input engine, not a keyboard layout.
Now click on the “Add” button at top right to add another input source.
Click on the three vertical dots “⋮” at the bottom to get the full list of languages. ibus-typing-booster supports many languages, even at the same time. Therefore it is not listed under any specific language but in the “Other” at the very bottom of the list. You could either scroll down to the “Other” section, click on it and then scroll again looking for “🚀 Typing Booster”, or you could use the search entry and search for “booster” for example.
When you find “🚀 Typing Booster”, select it and click the “Add” button.
Now the ibus-typing-booster engine has been added to the list of input methods configured in
ibus-setup. If you select that “🚀 Typing Booster” in the list of configured input methods inibus-setup, you can click the “Preferences” button to open the setup tool of the typing-booster engine. There you can customize ibus-typing-booster according to your preferences (You can also open the ibus-typing-booster setup tool later from the menu in the desktop panel).Now open some programs where you could type something, for example “gedit” or “gnome-terminal”. And activate the ibus-typing-booster engine by clicking on the icon for the input methods in the system tray and selecting “Typing booster” there.
When the input method menu of system tray icon is open and “Typing booster” is selected, there is a menu entry “Setup” which is a quicker way to open the setup tool of “Typing Booster” then starting
ibus-setupagain. Some options are also directly available in the input method menu of the system tray icon to have quicker access to these often used options.Near the top right in this video you see the “property panel” which shows the current status of some frequently used options which can also be changed by clicking on the “property panel”. The “property panel” also offers a button to open the setup tool of the ibus-typing-booster engine. You can move that “property panel” to around on your desktop to a convenient place.
Now type something, for example into gedit and you should see some suggestions for completions.
At the beginning, the suggestions only come from the hunspell dictionaries and are thus not very good yet. But ibus-typing-booster learns from your typing, it remembers which words you use often in which context. Therefore, the suggestions become much better over time.
To switch between ibus-typing-booster and other input methods or a simple keyboard layout, you can use the input methods menu you get by clicking on the system tray icon or you can use the keyboard shortcut, which is Super+Space by default (can be changed using
ibus-setup).
When using the Unity desktop on Ubuntu 16.04

Setup of Typing Booster on the Unity desktop of Ubuntu 16.04
This section shows the setup of ibus-typing-booster on the “Unity” desktop of ubuntu-16.04.
The information in this chapter is pretty old, maybe I should delete it soon. Current Ubuntu doesn’t use “Unity” anymore. It uses Gnome3 and behaves quite similar to Gnome3 on other distributions. But the “Unity” desktop was quite a bit different.
These instructions are for ibus-typing-booster 1.5.x. For ibus-typing-booster >= 2.0.0, all engines have been merged into one, so you won’t find many different “Typing Booster” engines for many different languages anymore, there is only one single “Typing Booster” engine now which supports all languages. That doesn’t make a big difference in these instructions though, so I hope it is not too confusing that the screenshots in this sections are not up-to-date with ibus-typing-booster >= 2.0.0.
Open the system settings by clicking on the icon showing a tooth-wheel and a wrench a the left side of the screen. Then click on the “Language Support” icon there. In the dialog which opens, make sure that “Keyboard input method system” is set to “IBus”.
Close that “Language Support” dialogue again and click on the “Text Entry” icon in the system settings.
Some input sources may be already be listed at the left side of this dialogue. In this example we see “English (US, with euro on 5)” which is not really an input engine, it is just a keyboard layout.
It is recommended to use a keyboard layout with ibus-typing-booster which has a real “AltGr” key and does not just make the “AltGr” or “Alt” key on the right side of the space bar basically a duplicate of the left “Alt” key. For details, see The “AltGr” key.
Now click on the “+” button at the lower left to add another input source.
Type the word “booster” into the search entry and you see the currently available language variants of ibus-typing-booster. Select the variant of ibus-typing-booster you want to use and click on “Add”.
Now you see that an ibus-typing-booster engine has been added to the list of input sources to use.
If you select it, a n icon showing a wrench and a screwdriver appears at the bottom right of the list, to the left of the icon showing a keyboard. Click the “wrench and screwdriver” icon to open the setup tool of ibus-typing-booster.
Here you see the setup tool of that ibus-typing-booster engine where you can customize ibus-typing-booster according to your preferences.
Now open some programs where you could type something, for example “gedit” or “gnome-terminal”. And activate the ibus-typing-booster engine you want to use in the input source menu of the panel as shown in this screenshot.
When the input source menu of the panel is open and an ibus-typing-booster engine is selected, there is a menu entry “Setup” which is an quicker way to open the setup tool ibus-typing-booster setup tool than going via the system settings.
Some options of ibus-typing-booster are also directly available in the input source menu of the panel to have quicker access to these often used options than having to open the setup tool. For example the option to switch emoji mode on or off is available in the panel menu. There are also key and mouse bindings for these frequently used options which are shown in the input source menu of the panel as well as a reminder.
Now type something, for example into gedit and you should see some suggestions for completions.
At the beginning, the suggestions only come from the hunspell dictionaries and are thus not very good yet. But ibus-typing-booster learns from your typing, it remembers which words you use often in which context. Therefore, the suggestions become much better over time.
To switch between ibus-typing-booster and other input methods or a simple keyboard layout, you can use the input sources menu in the panel or the keyboard shortcut, which is Super+Space by default (can be changed in the “Text Entry” dialogue of the system settings).
If you want to enable the ibus property panel or change the font size for the list of candidates, you can do that by starting the ibus-setup program.
To show the property panel set “Show property panel” to “Always” in ibus-setup.
The property panel is seen in this screenshot at the top right, just below the Unity panel. You can move the property panel anywhere you like by dragging its left edge. The property panel shows the current value of some options of ibus-typing-booster and allows to change them quickly.
The screenshot also shows how a much bigger font was chosen for the candidate list with the “Use custom font” option in ibus-setup.
Setup
Ibus-typing-booster has a setup tool which allows you to adapt the behaviour a lot to your preferences.
Basic setup for your language
This video shows how to set up languages and input methods in Typing Booster.
The most important setup in Typing booster is to choose which languages you want to use and how to input them.
ibus-typing-booster works for many languages and it may be necessary to change the default dictionaries and input methods to different ones.
When ibus-typing-booster is started for the very first time, it checks which locale is set in the environment and initializes its setup with dictionaries and input methods which are useful for this locale.
However, it is probably a good idea to open the setup tool and look whether these defaults are okay for you. You can open the setup tool by selecting ibus-typing-booster in the input method menu of the panel and then clicking on the “Setup” menu item.
At the beginning, this video shows the default dictionaries and input methods for the locale “hi_IN.UTF-8” (Hindi in India).
For this locale, one will get the dictionaries “hi_IN” (Hindi) and en_GB (British English) and the input methods “hi-inscript2” and “NoIME” by default. “hi-inscript2” is an input method for Hindi. “NoIME” means no input method at all, that means the characters are used as they come from the current keyboard layout without any transliteration. Having the British English dictionary and the “NoIME” input method there as well also makes it possible to type English.
As English is used quite a lot in India, it is probably a good default for the “hi_IN.UTF-8” locale to set up input for both Hindi and British English.
But the defaults guessed from the current locale are not always what a user wants. A user might use a “en_US.UTF-8” (American English) locale because they prefer the user interface in English but nevertheless might want to type Hindi. And even when running in the “hi_IN.UTF-8” locale, the defaults might not be optimal for some users. “hi-inscript2” is not the only input method to type Hindi, there are other choices. And maybe a Hindi user wants to use additional other languages and input methods completely unrelated to the current locale.
So the video shows how to add or remove dictionaries and input methods and move them up or down to change their priority. The video also shows how the “Input Method Help” button pops up an explanation what an input method does and how to use it.
Near the end, the video shows how the “Set to default” buttons can reset the lists of languages and input methods to the defaults for the current locale.
Both lists can hold a maximum of 10 items, you can have up to 10 dictionaries and 10 input methods. Don’t overdo it though, don’t add more than you really need, adding more dictionaries and input methods than one really needs slows down the system and reduces the accuracy of the word predictions.
The list of input methods cannot be made completely empty, as soon as you remove the last input method, the “NoIME” input method is automatically added back because no input at all makes no sense.
The list of dictionaries can be made empty though. That doesn’t seem particularly useful to me, but apparently there are some users who use ibus-typing-booster mostly as a convenient input method for emoji or special symbols and in that case you don’t need a dictionary.
More advanced options
This chapter explains more advanced options for adapting the behaviour and look and feel of ibus-typing-booster to your preferences.
Enable suggestions by a key
This video shows what the options “☑️ Enable suggestions by key” and “☑️ Use preedit style only if lookup is enabled” do.
By default, ibus-typing-booster pops up a list of candidates as soon as you type something and you can choose a candidate to complete the word you have started typing to save some key strokes, fix a spelling error, or select an emoji or special character.
But some users prefer not to have these candidate lists displayed all the time. Maybe they are fast touch typists and usually type without completion support and the frequent pop up of the candidate lists is too visually disturbing. Calculating the candidate lists also takes some time, especially if emoji predictions are enabled. These calculations may actually interfere with the typing for very fast typists.
But from time to time even exceptionally fast typists may still want to see candidates to complete a very long word or check the spelling or or input an emoji.
In that case it can be useful to check the option “☑️ Enable suggestions by key”.
If that option is enabled, no candidate list is shown unless a special key is pressed to request a candidate list. By default that special key is Tab but this can be changed by the customizing the keys bound to the command “enable_lookup”.
In the beginning of the video, this option is not enabled. When typing into the text editor one sees that after each single key typed a suggestion list with word completions pops up.
Then the option “☑️ Enable suggestions by key” is enabled. Now when typing into the text editor, no suggestions pop up unless Tab is pressed. So one sees that “Hello Worl” is typed without andy suggestions popping up, then Tab is pressed and suggestions containing “World” pop up.
There is another option “Minimum number of chars for completion” which is 1 by default. If that option is set to a number greater than 1, then a candidate list appears automatically only when that number of characters has been typed into the preedit. But using the keys bound to the “enable_lookup” command one can still request a candidate list even if fewer characters have been typed.
Some users using this option to show candidate lists only on request, request candidate lists only very rarely to complete an unusually long and complicated word or to type an emoji. When candidate lists are requested only very infrequently, some users dislike that the preedit, i.e. the currently typed word, is always underlined. It is possible to disable the underlining of the preedit in the “Appearance” tab of the setup tool: There is a combobox where one can choose no underlining for the preedit.
But one does not have to disable the underlining of the preedit completely: It is even possible to hide the underline indicating the preedit only as long as no candidate list is requested. To do this, there is the option “Use preedit style only if lookup is enabled” in the Appearances tab of the setup tool. Then the preedit looks like normal text until a candidate list is requested. As soon as the candidate list is requested, the preedit is again styled (usually underlined), this makes it clearer which part of the text has been used to calculate that candidate list. The use of this option is also shown near the end of the video.
⚠️ Attention when using Wayland: Currently it is not possible to do any style changes to the preedit on Wayland. On Wayland the preedit is always underlined and always has the same foreground and background colour as normal text, no matter what options to influence the preedit style are chosen in the setup tool of ibus-typing-booster. That is a missing feature in Wayland.
Use inline completion
The video above shows how “inline completion” looks like compared to “normal” completion.
Very often, the first candidate shown as a suggestion is already the desired one, especially after having used ibus-typing-booster for a while and it has learned what the user types often in what context.
When one ends up selecting the first candidate most of the time, popping up a candidate list with more candidates all the time is needlessly visually distracting.
When the option “Use inline completion” is checked, the first and most likely candidate is shown inline at the writing position without popping up a candidate list. The characters one has already typed are shown in the current foreground colour (black in the screenshot) and are underlined (Unless underlining the preedit has been switched off in the “Apperance” settings). The completion which is suggested is shown without the underline and in a different colour. This colour is gray by default because this works in most cases, it also works when the foreground text colour is white and the background black. The colour to be used for the inline completion can be chosen in the “Appearance” tab. One can also choose not to use a different colour, then the only difference in style between the completion and the already typed characters is the missing underline under the completion.
This inline completion style looks much nicer than always popping up a candidate list when the predictions are fairly good and the first candidate is often the desired one.
If that first candidate shown inline is what one wants, one can select it by typing any of the keys bound to the “select_next_candidate” command (Tab and arrow down by default).
When the candidate is selected, the style of the completion becomes the same as the style of the already typed characters and the cursor moves to the end of the completion.
Now one could commit it for example by typing space and continue typing the next word of the text.
Or, if that candidate displayed inline happens to be not the desired one, it is still possible to pop up a full candidate list with more candidates by pressing the key bound to the “select_next_candidate” command (Tab by default) again. And then walk down the candidate list by continue pressing that key. If nothing appropriate can be found in the whole candiate list, one can use the key bound to the command “cancel” (the Escape key by default) to deselect all candidates and close the candidate list. Then one could type more input characters and hope that better suggestions become available after typing a bit more.
One can also ignore the candidate displayed inline completely and just continue typing more input characters until a better candidate is displayed.
Inline completion is hard to use on Wayland
⚠️ Attention when using Wayland: Currently it is not possible to do any style changes to the preedit on Wayland. On Wayland the preedit is always underlined and always has the same foreground and background colour as normal text, no matter what options to influence the preedit style are chosen in the setup tool of ibus-typing-booster. That is a missing feature in Wayland.
This makes the “Use inline completion” option quite hard to use on Wayland. It is possible to use it, but as the characters typed and the suggested completion are displayed in exactly the same style, it is quite hard to see what has been typed and what is the completion. If one looks carefully, one can still see it because the cursor can be seen at the end of the typed characters, everything to the right of the cursor is the suggested completion. If the completion is selected by typing the key bound to the “select_next_candidate” command (Tab by default), then the cursor moves to the end of the completion.
One can get used to the fact that the difference between the typed text and the inline completion is hard to see on Wayland, but I found this to be quite hard.
Spellchecking
ibus-typing-booster also does spellchecking (Using hunspell for most languages and voikko for Finnish).
If a word is typed which might contain a spelling error, the candidate list of suggestions may contain suggestions for spelling corrections, i.e. words which are not just completing the text already typed to something longer or fixing some accents but “seriously” changing the characters already typed, more than just fixing accents, i.e. completely different characters or another order of characters.
Optionally, such spellchecking suggestions can be marked in the candidate list with a symbol or using a different colour in the candidate list. The symbol and color can be chosen.
One can also choose to mark candidates which are (accent insensitive) completions of the typed word with a symbol and/or colour if they are valid words in one of the dictionaries.
And one can choose to mark candidates which are (accent insensitive) completions of the typed word with a symbol and/or colour if they have been remembered in the user database because the user has typed them before.
All of these markings can help to get the spelling right, for example if one uses a French dictionary and types “egali” and sees “égalité” and “égalisation” marked as “dictionary suggestions” in the candidate list, then one knows that these candidates are valid words in the French dictionary and what one typed was identical to the beginning of these candidates except for differents in accents.
It can also speed up typing not bothering typing the accents at all (because this often requires extra key strokes) and then select the correctly accented word from one of the “dictionary suggestions”.
Colour in the candidate list does not work when using Gnome, only on other desktops colour can be used in the candidate list. Marking spellchecking suggestions with a symbol also works on Gnome. By default, neither colour nor symbols are used for suggestions.
Indicating spelling errors in the preedit
One can choose that the preedit changes colour when the typed word is not a valid word in any of the dictionaries setup in the ”Dictionaries and input methods” tab of the setup tool.
For example, if one uses an English and a French dictionary, and the typed word in the preedit is neither a valid word in English nor in French, then the preedit changes colour. This is also shown in the above screenshot using the default colour red.
Dictionaries where spellchecking is not supported are ignored for this colour change. For example, if one uses an English, a French, and a Japanese dictionary at the same time, the preedit still changes colour if the word is neither a valid English nor a valid French word. Whether the typed word is in the Japanese dictionary or not doesn’t matter because the Japanese dictionary does not support spellchecking.
⚠️ Attention when using Wayland: On Wayland it is not possible to indicate a possible spelling error in the preedit.
Currently it is not possible to do any style changes to the preedit on Wayland. On Wayland the preedit is always underlined and always has the same foreground and background colour as normal text, no matter what options to influence the preedit style are chosen in the setup tool of ibus-typing-booster. That is a missing feature in Wayland.
Toggle input mode on/off (Direct Input Mode)
This video shows how to configure a key to quickly toggle Typing Booster on/off.
It is possible to switch Typing Booster off by switching to another
input method or a keyboard layout. That can be done using either the
menu in the panel or the shortcut key to switch input methods which is
Super_L+Space by default.
Doing this with the menu in the panel is slow because one has to use the mouse.
But using the Super_L+Space shortcut to switch off Typing Booster is a
bit slow as well because:
It needs two key presses by default
Even if one changes the default to something which needs only a single key press, when pressing that key combination, a selection menu of input methods and keyboard layouts pops up. Usually there are more then just 2 input methods or keyboard layouts in that menu. Therefore, one may need even more keypresses (
spaceor theLeftor theRightarrow keys) to select the desired plain keyboard layout to switch typing booster off.By switching to the plain keyboard layout, one looses the Compose support of Typing Booster which has extra features.
Therefore, if one wants a really quick way to switch Typing Booster
off and on again while keeping the currently used keyboard layout and
the Compose support of Typing Booster, it is useful to configure a
keybinding for the command toggle_input_mode_on_off using the setup
tool as shown in the video.
By default, the keybinding for toggle_input_mode_on_off is empty.
As soon as the keybinding for toggle_input_mode_on_off is set to
something non-empty, a new option “☑️ Remember input mode” appears in
the “Options” tab of the setup tool. If this option is switched on,
the current state, i.e. whether Typing Booster is currently on or off,
is remembered and restored when the desktop is restarted (or when Ibus
is restarted or the whole computer is rebooted).
Also, when the keybinding for toggle_input_mode_on_off is set to
something non-empty, a new entry in the menu in the panel appears
where one can switch Typing Booster on or off using the mouse.
The video shows that the icon in the panel changes when Typing Booster is switched on or off. A rocket (🚀) indicates that it is on, a snail (🐌) indicates that it is off.
⚠️ Attention: There is a subtle difference between the IBus
key binding to switch between input methods (default Super_L+space)
and a Typing Booster key binding to switch Typing Booster on/off:
The IBus key binding works everywhere on the desktop
The Typing Booster on/off key binding only works when something which can receive input has focus
See also: ⚠️ Caveat: Key bindings can only work when there is input focus.
Reopening preëdits
This video shows that when the option “☑️ Enable reopening preedits” is switched on, preëdits can be reopened when the cursor reaches the end or the beginning of an already committed word again.
In the video one can see that “Writing some ” is typed. The underline under the word “some” which indicates the preëdit has already disappeard because the word “some” has been committed by typing the space.
But then the cursor is moved back by typing Left (arrow left) and
reaches the right end of the word “some”. This causes the word “some”
to be put into preëdit again. Now “some” is underlined again and a
completion “something” is suggested.
⚠️ Problems with this feature and why it doesn’t always work at the moment:
To be able to do this reopening of preëdits, the “surrounding text” feature must be available and work well. “surrounding text” means that Typing Booster is able to ask “What text is there near the cursor position?” and “What is the cursor position?”. If getting the surrounding text shows that there is a word next to the cursor like “some” in the above example, then “surrounding text” support enables Typing Booster to delete that word from the text and to open a new preëdit containing that word an look for completions. If “surrounding text” doesn’t work right, reopening preëdits cannot work correctly.
Not all toolkits and applications support “surrounding text” and some implementations are incomplete and/or buggy. I try to detect when it doesn’t work right and if there seem to be problems then I don’t reopen the preëdit.
Therefore, the are currently some limitations for reopening of preëdits:
Does never work in Qt4 (no “surrounding text” support).
Does never work in X11 programs like “xterm” (no “surrounding text” support).
Does never work in gnome-terminal and xfce4-terminal (incomplete “surrounding text” implementation in vte). Typing Booster detects these two terminals because they both set
InputPurpose.TERMINAL. WhenInputPurpose.TERMINALis set, Typing Booster does not try to reopen preëdits at the moment (2021-09-16).Does not seem to work in Gnome Wayland currently (2021-09-16), only Gnome Xorg works.
There seem to be many bugs even in the “partly working” implementations of “surrounding text”:
When a window receives focus, surrounding text seems to return false results in that window until at least one commit happened after receiving focus. To work around problems caused by this, I don’t try to reopen preëdits if not at least one commit has happened after a window received focus.
Sometimes, when I compare what “surrounding text” gives me before and after a cursor movement, the difference is weird. For example, when something like
Leftor ‘BackSpacehas been typed and the difference between the “surrounding text” before and after that key cannot be explained by the effect of that key, then something must have gone wrong and I do **not** try to reopen the preëdit. If I tried to reopen a preëdit in such a case with wrong information from “surrounding text” it would cause chaotic results, so better to nothing than create a mess. Therefore, sometimes it happens that one types a key likeLeft` and reaches the end of a word and no preëdit is opened.Only the keys
Left,Right,KP_Left,KP_Right,BackSpace,Delete,KP_Deleteare might currently reopen preëdits. Other keys which move the cursor likeUp,Down,Page_Up,End, …, are currently (2021-09-16) not considered for reopening preëdits. At the moment, “surrounding text” support seems too buggy to consider these other keys moving the cursor, the results returned by “surrounding text” when these keys were typed are almost always strange.Positioning the cursor with the mouse currently never reopens a preëdit. I cannot get correct “surrounding text” results after mouse movements at the moment (2021-09-16).
Disabling in terminals
The above video shows how to disable Typing Booster in terminals using the
☑️ Disable in terminals
option.
Some users may want to disable Typing Booster in terminals because
Shells like bash have their own features to complete commands, options, and file names, which are often more useful for those purposes than Typing Booster’s completions, which are designed for natural language text.
Sometimes password prompts are shown in shells when using
ssh,sudo, and others. When Typing Booster is active while typing a password, the password will be visible in the preëdit and saved to Typing Booster’s user database. Therefore, if you use Typing Booster in a shell, you should be careful to switch it off manually when typing passwords. If you don’t find Typing Booster useful in shells, it’s easier to disable it completely for terminals.
To disable Typing Booster in terminals, check the “☑️ Disable in terminals” option. If you do so, Typing Booster will mostly disable itself in terminals, except for Compose support, which doesn’t interfere with shell completion or password input.
Please note that whether this option works or not depends on the
terminal and desktop used. It works best for Gtk-based terminals like
xfce4-terminal, gnome-terminal, and gnome-console, as these set the
input purpose to TERMINAL, which Typing Booster can easily check. For
other terminals like konsole (from KDE) or Xorg-based terminals like
xterm, rxvt, urxvt, etc., Typing Booster falls back to checking the
program name and window title to determine whether they are terminals
it currently knows.
List of terminals currently known by Typing Booster which do not set
input purpose TERMINAL:
- konsole
- xterm
- rxvt
- urxvt
On Xorg desktops like Gnome Xorg, Plasma Xorg, Xfce, etc., Typing
Booster can reliably get the program name and window title using
xprop. Therefore, on Xorg it works reliably and out of the box for all
terminals Typing Booster knows. If you use a different terminal not on
the above list, please let us know so we can add it to the list.
On Wayland desktops like Gnome Wayland and Plasma Wayland, Typing
Booster uses the accessibility interface
AT-SPI
to get the program name and window title. This works out of the box on
Gnome Wayland, but for Plasma Wayland you need to set
QT_LINUX_ACCESSIBILITY_ALWAYS_ON=1 in the environment. If
you use non-Gtk Terminals in Plasma Wayland, please put export QT_LINUX_ACCESSIBILITY_ALWAYS_ON=1 in your ~/.profile. Getting
the program name and window title using AT-SPI mostly works just fine,
but in very rare circumstances it can fail; using xprop on Xorg
desktops is more reliable.
Please note that if you disable Typing Booster as described above in terminals, you won’t be able to switch it on again temporarily. If you want to disable Typing Booster always when the focus enters a terminal but still be able to switch it on using a key binding, please see the more advanced setup in the “Autosettings” chapter.
Autosettings
This video shows how one can add automatic settings, i.e. settings which change automatically depending on which window gets focus. In the setup tool of Typing Booster is an “Autosettings” tab where one can add settings to be changed, and then enter the value the setting should be changed to. Then one can add a regular expression which triggers the change when it matches when a window or browser tab gets focus.
The client id string the regular expression needs to match consists of three parts separated by “:”:
<im toolkit>:<program name>:<window title>
Here are a few examples for such client id strings:
gtk3-im:xfce4-terminal:Terminal - mfabian@fedora:~
gtk3-im:firefox:Duolingo - La meilleure façon d'apprendre l'italien — Mozilla Firefox
gtk3-im:gedit:Untitled Document 2 - gedit
gtk4-im:gnome-text-editor:New Document (Draft) - Text Editor
QIBusInputContext:konsole:~ : bash — Konsole
To check how exactly that client id string looks like for the window or browser tab one is interested in one can set the “Debug level” option in the “Options” tab in the setup tool to a value >= 1.
Then type into the window using Typing Booster until a candidate list is shown On top of the candidate list there will be debug output like
🪟gtk3-im:xfce4-terminal:Terminal - mfabian@fedora:~
This is also shown near the end of the demonstration video above, when “test” is typed into the xfce4-terminal.
Or, one can grep the debug.log file for apply_autosettings like
this (also with “Debug level” >= 1):
tail -F ~/.local/share/ibus-typing-booster/debug.log | grep apply_autosettings
and see what appears there when the interested window or browser tab gets focus, one should see matches like this:
2023-02-27 15:13:27,739 hunspell_table.py line 6714 _apply_autosettings DEBUG: self._im_client=gtk3-im:xfce4-terminal:Terminal - mfabian@fedora:~
In the demonstration video these autosettings are added in the setup tool:
| Setting | Value | Regular expression |
|---|---|---|
dictionary | en_GB,fr_FR | gtk3-im:gedit: |
dictionary | it_IT,fr_FR | gtk3-im:firefox:Duolingo |
inputmode | false | gtk3-im:.*terminal.*: |
The “default” dictionaries setup in the “Dictionaries and input
methods” tab of the setup tool are es_ES,de_DE. In the video one
can see that “es_ES 🇪🇸” is shown in the floating toolbar of ibus while
the focus is still in the setup tool.
After finishing the setup of the autosettings, the focus is moved to
the “Duolingo” tab in firefox and the dictionary setting
automatically changes to “it_IT,fr_FR” which one can see in the
floating toolbar which now shows “it_IT 🇮🇹”.
Then the focus is moved to gedit and the dictionaries are changed to
“en_GB,fr_FR” which is visible in the floating toolbar as “en_GB 🇬🇧”.
Finally, the focus is moved to the xfce4-terminal and the
dictionaries revert to the “default” value of es_ES,de_DE and the
floating toolbar shows “es_ES 🇪🇸” again. On top of that, the
autosetting to switch the input mode to false in the terminal did
match, one can see that because the icon in the floating toolbar and
the panel switched from 🚀 (Rocket, means Typing Booster is on) to 🐌
(Snail, means Typing Booster is in direct input mode, which basically
means off except for Compose support). But one can still switch
Typing Booster on again temporarily in that terminal if one has set a
keybinding for the command toggle_input_mode_on_off. For the
demonstration video, the keybinding for toggle_input_mode_on_off has
been set to ['Control+Tab'] (For details see Toggle input mode
on/off (Direct Input Mode)). When this key combination is
typed into the terminal, the icon changes from 🐌 to 🚀 again and
Typing Booster is on again in that terminal. Moving the focus out of
the terminal and back into the terminal switches Typing Booster off
again.
This differs from the Disabling in terminals option, which completely disables Typing Booster without the option to switch it back on within the terminal.
⚠️ Attention when using Wayland: On Wayland it may be necessary to
set the following environment variables in ~/.profile to enable
Typing Booster to get the program names and window titles:
export GNOME_ACCESSIBILITY=1
export QT_LINUX_ACCESSIBILITY_ALWAYS_ON=1
export QT_ACCESSIBILITY=1
On Wayland desktops like Gnome Wayland and Plasma Wayland, Typing
Booster uses the accessibility interface
AT-SPI
to get the program name and window title (on Xorg desktops the xprop
program is used). This accessibility interface is enabled by default
on Gnome Wayland except for the two browsers firefox and
google-chrome. For these browsers, GNOME_ACCESSIBILITY=1 has to
be in the environment to make it work. Qt5 programs on Wayland need
QT_LINUX_ACCESSIBILITY_ALWAYS_ON=1 and Qt4 programs on Wayland need
QT_ACCESSIBILITY=1.
Forcing an IBus keymap
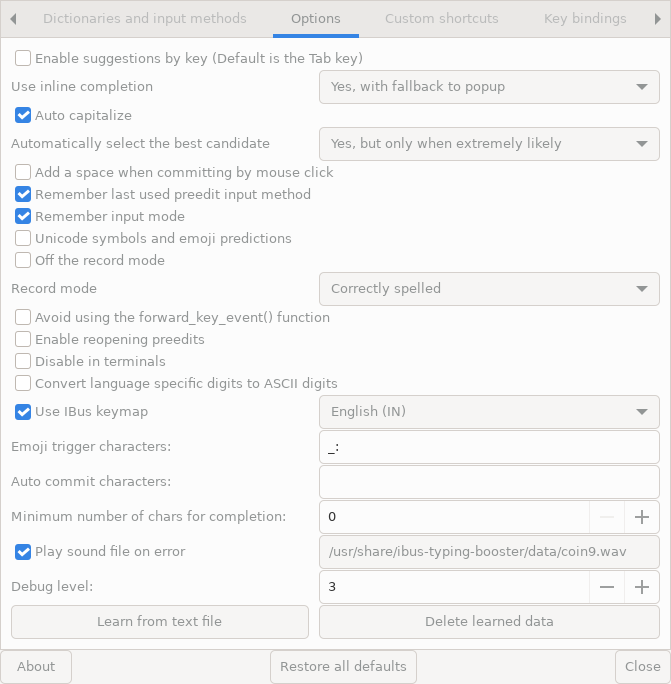
Screenshot of the Options-Tab of the Typing Booster setup tool
By default, Typing Booster uses the keyboard layout which was active before switching to Typing Booster. That is also probably the best for most users.
For example, if one is using an English (US) keyboard layout and then switches to Typing Booster, then that English (US) keyboard layout will continue to be used in Typing Booster. If one uses a Russian keyboard layout before switching to Typing Booster, then that Russian layout will continue to be used in Typing Booster.
To change to using a different keyboard layout, one normally has to switch to the keyboard layout one wants to use and then back to Typing Booster.
But there are cases when one wants to always use an English layout while using Typing Booster and always use other keyboard layouts while not using Typing Booster.
If one does not need to use m17n input methods while using Typing Booster, i.e. uses Typing Booster only with direct keyboard input (“NoIME”), any keyboard layout can be used. Including keyboard layouts which don’t produce ASCII letters like Russian, Greek, and many other keyboard layouts.
But most m17n input methods require a keyboard layout which can produce ASCII characters. Some even require the use of the English (US) layout or layouts which are very close variants of the English (US) layout like English (IN).
Therefore, if one wants to use m17n input methods in Typing Booster, then one needs a keyboard layout which can produce ASCII characters.
It doesn’t have to be a variant of the English (US) layout, many m17n input methods work fine with any keyboard layout which can produce ASCII characters, i.e. one could use a German or a French layout or any other layout producing ASCII characters.
M17n input methods which work well with any keyboard layout producing
ASCII characters are phonetic input methods (e.g. something like
hi-itrans, ru-translit, …) or postfix/prefix input methods
(e.g. t-latn-post, t-latn-pre, …) or some symbol input methods
(t-rfc1345, t-unicode, …).
As some of the m17n input methods make use of an ISO_Level3_Shift
key, it is a good idea if such a key is available. The English (IN)
layout has such a key on the right Alt key and is therefore usually a
better choice than the English (US) layout. But many other keyboard
layouts, for example the German layout or even some other variants of
the English (US) layout, for example English (US, Euro on 5) also
feature an ISO_Level3_Shift key, usually also on the right Alt key
(on some hardware keybords “AltGr” is printed on the keycap). And in
some desktops, for example in the Gnome desktop, one can choose an
“Alternate Characters Key” in the keyboard settings of the control
centre. In the Gnome Control Centre one can choose to have that
“Alternate Characters Key” on “Left Alt”, “Right Alt”, “Left Super”,
“Right Super”, “Menu Key”, or “Right Ctrl”. I.e. if using Gnome, one
could even use the basic English (US), which does not originally have
such a key and still have such a key because Gnome adds it.
Some m17n input methods emulate keyboard layouts. For example
ar-kbd, emulates an Arabic keyboard layout, ru-kbd emulates a
Russian keyboard layout, etc. … And the Indian *-inscript and
*-inscript2 m17n input methods and several other Indian m17n input
methods are also emulating keyboard layouts. Almost all of the m17n
input methods emulating keyboard layouts assume that the “real”
keyboard layout where the key events come from is based on the
English (US) layout. On top of that, many of these m17n input methods
also require that an ISO_Level3_Shift key is available, that makes
English (IN) almost always a better choice than English (US) (Unless
an ISO_Level3_Shift key is available for other reasons already, for
example because of Gnome, then the difference between English (IN) and
English (US) doesn’t matter).
For the reasons explained above, some users may want to use an
English (IN) keyboard layout always while using a particular
Typing Booster engine but also use one or more very different keyboard
layouts when not using that particular Typing Booster engine
(i.e. when using just a keyboard layout, a different Typing Booster
engine or even a completely different input method like the Japanese
input method ibus-anthy).
For such users it is helpful, if a Typing Booster engine “translates” all incoming key events to a variant of an English keyboard layout like English (IN) while that Typing booster engine is in use.
The option
☑️ Use IBus keymap [ English (IN) ]
does just that. If that option is selected, the key events coming from the “real” keyboard layout are “translated” to the events which would have been produced by the typed key if an English (IN) keyboard layout had been active. I.e. the selection of the “real” keyboard layout is not changed, it is still the same layout which was last used before switching to that Typing Booster engine. But all the key events are “translated” to the English (IN) IBus keymap.
IBus currently offers 4 such keymaps, as can be seen by looking into this directory:
$ ls /usr/share/ibus/keymaps/
common  in  jp  kr  modifiers  us
I.e. IBus supports the in “English (IN)”, jp “English (JP)”, kr
“English (KR)”, and jp “English (JP)” keymaps.
The in IBus keymap is almost the same as the us IBus keymap and just
replaces the keycode 100 (wich is the right Alt key) with
ISO_Level3_Shift:
$ cat /usr/share/ibus/keymaps/in
include us
keycode 100 = ISO_Level3_Shift
$
The kr IBus keymap is also almost the same as the us IBus keymap and
just adds to keys relevant only to Korean input:
$ cat /usr/share/ibus/keymaps/kr
include us
keycode 122 = Hangul
keycode 123 = Hangul_Hanja
$
and the jp IBus keymap has all the alphanumeric characters on the
same keys as the us IBus keymap but has many non-alphanumeric
characters on different keys (and also adds some special keys
(Zenkaku_Hankaku, Henkan_Mode, …)):
$ cat /usr/share/ibus/keymaps/jp
include common
    shift keycode 2 = exclam
    shift keycode 3 = quotedbl
    shift keycode 4 = numbersign
    shift keycode 5 = dollar
    shift keycode 6 = percent
    shift keycode 7 = ampersand
    shift keycode 8 = apostrophe
    shift keycode 9 = parenleft
    shift keycode 10 = parenright
    shift keycode 11 = asciitilde
keycode 12 = minus
    shift keycode 12 = equal
keycode 13 = asciicircum
    shift keycode 13 = asciitilde
keycode 26 = at
    shift keycode 26 = grave
keycode 27 = bracketleft
    shift keycode 27 = braceleft
keycode 39 = semicolon
    shift keycode 39 = plus
keycode 40 = colon
    shift keycode 40 = asterisk
keycode 41 = Zenkaku_Hankaku
keycode 43 = bracketright
    shift keycode 43 = braceright
keycode 51 = comma
    shift keycode 51 = less
keycode 52 = period
    shift keycode 52 = greater
keycode 53 = slash
    shift keycode 53 = question
    shift keycode 58 = Eisu_toggle
keycode 89 = backslash
    shift keycode 89 = underscore
keycode 92 = Henkan_Mode
keycode 93 = Hiragana_Katakana
keycode 94 = Muhenkan
keycode 124 = yen
    shift keycode 124 = bar
keycode 122 = Hangul
keycode 123 = Hangul_Hanja
    shift keycode 84 = Execute
keycode 112 = Katakana
I think for most users which may want to use the option
☑️ Use IBus keymap [ English (IN) ]
“English (IN)” is the best choice as it is the same as English (US) except for
adding the important ISO_Level3_Shift key.
But as I wrote at the very start of this chapter, this option is already quite special and most users probably do not need to use it at all and should just leave it unchecked (which is the default):
☐ Use IBus keymap [ English (IN) ]
Enable this only if you really need it and know what you are doing! It can be very confusing!
Simulate the behaviour of ibus-m17n
The video demonstrates how to use the simple additional engines of ibus-typing-booster to mimic the behavior of ibus-m17n.
⚠️ Note: The video shows underlining in the preedit text. That option is off by default in both ibus-m17n and ibus-typing-booster. But for this video it has been switched on because it is helpful to compare the behavior of ibus-m17n with the Typing Booster engines emulating it, it makes it easier to see that both commit text at the exact same moments (The video has been recorded in a Gnome X11 session, in a Gnome Wayland session the preedit is always underlined with a single underline anyway, no matter how the options in the engines are set).
ibus-typing-booster can fully emulate the behavior of ibus-m17n by configuring its settings to disable all advanced features, restricting it to the simpler behavior of ibus-m17n.
Using ibus-typing-booster to simulate ibus-m17n has advantages, including more active maintenance and likely fewer bugs.
To emulate ibus-m17n with ibus-typing-booster, one could use the following setup options:
- Dictionaries and input methods tab:
- Remove all input methods except the one you want to use
- Remove all dictionaries
- Options tab:
- Uncheck the option “☐ Word predictions”
- Uncheck the option “☐ Unicode symbols and emoji predictions”
- Make the entry for “Emoji trigger characters” empty
- Check the option “Off the record mode”
- Key bindings tab:
- Bind the command “commit_and_forward_key” to the key “Left”
- Appearance tab:
- Set “Preedit underline” to “None”
With these settings, no candidate lists will appear because neither words can be predicted nor emoji. This behavior matches ibus-m17n, where candidate lists are never shown.
Additionally, binding the “commit_and_forward_key” command to the “Left” key ensures that the behavior is consistent with ibus-m17n, where pressing “Left” does not move the cursor but commits the preedit text.
Enabling “Off the record mode” prevents user input from being recorded. This is useful because recording input is typically meant to improve suggestions based on prior input—something unnecessary when suggestions are disabled.
Since dictionaries are also irrelevant without candidate lists, they can be removed entirely or left as-is—it makes no difference.
By default, Typing Booster retains text in the preedit until a word is completed to predict completions. However, if the following conditions are true:
- Only one input method
- No word predictions (“☐ Word predictions”)
- No emoji predictions (“☐ Unicode symbols and emoji predictions”)
- The input does not start with an emoji trigger character
then Typing Booster commits text as soon as possible, just like ibus-m17n.
The emoji trigger characters do not have to be completely empty if one
prefers early commits like ibus-m17n does. It is possible to choose
one or more characters which rarely appear in normal typing as emoji
trigger characters. In that case, early commits can still happen
except for words which start with an emoji trigger character, these
words are kept in preedit then for the emoji search. For example if
_ is used as an emoji trigger character, then the input
_face_disappointed will be kept in preedit and emojis will be
searched which match the 2 search words face and disappointed.
To simplify this setup process to emulate ibus-m17n, Typing Booster offers preconfigured engines that emulate ibus-m17n out of the box. For example:
$ ibus list-engine  | grep latn-post
  tb:t:latn-post - t-latn-post (tb)
  m17n:t:latn-post - t-latn-post (m17n)
$ ibus list-engine  | grep hi-itrans
  tb:hi:itrans - hi-itrans (tb)
  m17n:hi:itrans - hi-itrans (m17n)
$
For each m17n:language:name engine, Typing Booster provides a
corresponding tb:language:name engine with identical behavior. Using
these preconfigured engines eliminates the need to set up restrictions
manually, allowing you to keep the “normal” Typing Booster engine
unrestricted for advanced features like completion, spell-checking,
predictions, and multilingual input.
$ ibus list-engine  | grep booster
  typing-booster - Typing Booster
$
unrestricted and still use the “normal” typing booster engine for its more fancy features like completion, spellchecking, predictions based on previous user input and multilingual input.
If you used the ☑️ Use US keyboard layout option in an ibus-m17n
engine, you want to use the ☑️ Use IBus keymap [ English (IN) ]
option to force the use of an English IBus keymap in the
ibus-typing booster engine mimicking that ibus-m17n engine.
⚠️ Current limitations:
Preedit Colours (currently work only on Xorg, not on Wayland):
Since Typing Booster >= 2.27.53, a foreground colour for the m17n preedit text can be set.
Unlike ibus-m17n, Typing Booster does not support configuring a background colour for the m17n preedit text This feature is unlikely to be added.
Key and Mouse bindings
The “AltGr” key
Ibus-typing-booster does not change your keyboard layout, it just uses the keyboard layout which was selected last.
As some of the default key bindings in the table below use key combinations starting with “AltGr”, it is recommended to use a keyboard layout where the right “Alt” key is really an “AltGr” key and not just a duplicate of the left “Alt” key. If you do not have a real “AltGr” key, you can still use most of the key bindings in the table below but of course not those which start with “AltGr”. In that case, you might want to use the setup tool to customize your key bindings.
The standard “English (US)” keyboard layout makes the “AltGr” key on the right side of the space bar basically behave as a duplicate of the left “Alt” key. So if you like the US English layout, better use the keyboard layout “English (US, with euro on 5)” instead of the standard one. “English (US, with euro on 5)” is very similar to the standard “English (US)” layout but has a real “AltGr” key.
Many (but not all) keyboard layouts for other languages different from US English already have a real “AltGr” key.
You can check whether your keyboard layout has a real “AltGr” key with “xev”, “xev” should show you the keysym “ISO_Level3_Shift” when pressing the “AltGr” (right “Alt”) key and not the keysym “Alt_R”.
Table of default key bindings
Some of these key bindings can be customized in the setup tool, see Customizing key bindings. The following table explains the defaults.
| Key combination | Effect |
|---|---|
Space | Commit the preëdit (or the selected candidate, if any) and send a space to the application, i.e. commit the typed string followed by a space. |
Return | Commit the preëdit (or the selected candidate, if any) and send a
Return to the application. |
KP_Enter | Commit the preëdit (or the selected candidate, if any) and send a
KP_Enter to the application. |
Tab | Bound by default to the commands “select_next_candidate” and “enable_lookup”.
|
Shift+Tab | Bound by default to the command “select_previous_candidate”. Selects the previous candidate in the candidate list. |
Escape | Bound by default to the command “cancel”.
|
Left (Arrow left) | Move cursor one typed key left in the preëdit text. May trigger a commit if the left end of the preëdit is reached. |
Control+Left | Move cursor to the left end of the preëdit text. If the cursor is
already at the left end of the preëdit text, trigger a commit and send
a Control+Left to the application. |
Right (Arrow right) | Move cursor one typed key right in preëdit text. May trigger a commit if the right end of the preëdit is reached. |
Control+Right | Move cursor to the right end of the preëdit text. If the cursor is
already at the right end of the preëdit text, trigger a commit and
send a Control+Right to the application. |
BackSpace | Remove the typed key to the left of the cursor in the preëdit text. |
Control+BackSpace | Remove everything to the left of the cursor in the preëdit text. |
Delete | Remove the typed key to the right of the cursor in the preëdit text. |
Control+Delete | Remove everything to the right of the cursor in the preëdit text. |
Down (Arrow down) | Bound by default to the command “select_next_candidate”. Selects the next candidate. |
Up (Arrow up) | Bound by default to the command “select_previous_candidate”. Selects the previous candidate. |
Page_Up | Bound by default to the command “lookup_table_page_up”. Shows the previous page of candidates. |
Page_Down | Bound by default to the command “lookup_table_page_down”. Shows the next page of candidates. |
F1 | Commit the candidate with the label “1” followed by a space |
F2 | Commit the candidate with the label “2” followed by a space |
| ... | ... |
F9 | Commit the candidate with the label “9” followed by a space |
Control+F1 | Remove the candidate with the label “1” from the database of learned user input (If possible, if this candidate is not learned from user input, nothing happens). |
Control+F2 | Remove the candidate with the label “2” from the database of learned user input (If possible, if this candidate is not learned from user input, nothing happens). |
| … | … |
Control+F9 | Remove the candidate with the label “9” from the database of learned user input (If possible, if this candidate is not learned from user input, nothing happens). |
1 … 9 | By default, same as F1 … F9.Selecting candidates with 1 … 9 is a bit easier
because the number keys 1 … 9
are closer to the fingers then F1 … F9 on
most keyboards. On the other hand, it makes completing when typing
numbers impossible and it makes typing strings which are combinations
of letters and numbers like “A4” more difficult. If digits are used as
select keys, numbers can only be typed when no candidate list is
shown. In most cases this means that numbers can only be typed when
nothing else has been typed yet and the preëdit is empty. |
KP_1 … KP_9 | By default, same as F1 … F9. |
Control+1 … Control+9 | By default, same as Control+F1 … Control+F9. |
AltGr+F6 | Bound by default to the command “toggle_emoji_prediction”. Toggle the emoji and Unicode symbol prediction on/off. This has the same result as using the setup tool to change this. |
AltGr+F9 | Bound by default to the command “toggle_off_the_record”. Toggle the “Off the record” mode. This has the same result as using the setup tool to change this. While “Off the record” mode is on, learning from user input is disabled. If learned user input is available, predictions are usually much better than predictions using only dictionaries. Therefore, one should use this option sparingly. Only if one wants to avoid saving secret user input to disk it might make sense to use this option temporarily. |
AltGr+F10 | Bound by default to the command “setup”. Opens the setup tool. |
AltGr+F12 | Bound by default to the command “lookup_related”. Shows related emoji and Unicode symbols or related words |
AltGr+Space | Insert a literal space into the preëdit. |
When more than one input method at the same time is used, the following additional key bindings are available:
| Key combination | Effect |
|---|---|
Control+Down | Bound by default to the command “next_input_method”. Switches the input method used for the preëdit to the next input method. |
Control+Up | Bound by default to the command “previous_input_method”. Switches the input method used for the preëdit to the previous input method. |
Mouse bindings
These mouse bindings are currently hardcoded and can not yet be customized.
| Mouse event | Effect |
|---|---|
Button1 click on a candidate | Commit the candidate clicked on followed by a space (Same as F1…F9). |
Control+Button1 click on a candidate | Remove clicked candidate from database of learned user input (If possible, if this candidate is not learned from user input, nothing happens). |
Button3 click on a candidate | Show related emoji and Unicode symbols or related words (Same as AltGr+F12). |
Control+Button3 click anywhere in the candidate list | Toggle the emoji and Unicode symbol prediction on/off (Same as AltGr+F6). This has the same result as using the setup tool to change this. |
Alt+Button3 click anywhere in the candidate list | Toggle the “Off the record” mode (Same as AltGr+F9). This has the
same result as using the setup tool to change this. While “Off the record” mode is on, learning from user input is disabled. If learned user input is available, predictions are usually much better than predictions using only dictionaries. Therefore, one should use this option sparingly. Only if one wants to avoid saving secret user input to disk it might make sense to use this option temporarily. |
⚠️ Caveat: Key bindings can only work when there is input focus
Key bindings of Typing Booster only work when something where one can actually can type into has focus.
For example, if you type some keys while the focus is on the desktop background or while the focus is on a webpage and no input area in that webpage has focus, then Typing Booster doesn’t see these key events at all! So there is no way Typing Booster can react in any way to such key events.
Only when something has focus which can actually receive input Typing Booster gets the key events and can react to the key events and do something.
Customizing key bindings
This video shows how one can change a keybinding.
In the “Key bindings” tab of the setup tool of ibus-typing-booster one sees a list of commands and the key combinations bound to execute these commands.
As an example, the video shows changing the key binding for the command
“select_next_candidate”. By default this command is bound to
['Tab', 'ISO_Left_Tab', 'Down', 'KP_Down'].
The video shows how to remove the key Tab and add Control+Tab
instead and then, finally use the “Set to default” button to
go back to the default setting.
And can also see in the screenshot that some commands are bound by default to Mod5+something. Mod5 is Usually ISO_Level3_Shift and this is mapped to the AltGr key on many keyboard layouts, see also The “AltGr” key. If your keyboard layout does not have that key, you might want to change these settings.
Customizing key bindings using digits
In the default key bindings, the digit keys on the “normal”
layout (1, …, 9) and the digit keys on the keypad (KP_1, …,
KP_9) and the F1, …, F9 keys are bound to the commands
commit_candidate_1_plus_space, …, commit_candidate_9_plus_space.
The digit keys 1, …, 9 are usually closer to the fingers as the
F1, …, F9 keys and thus somewhat more convenient to commit
candidates via their number. But using the digits for that purpose
makes it impossible to type digits into the preëdit.
That makes typing something like “A4 paper” quite difficult.
Because when the A is typed, some completions starting with “A”
are shown and the 4 then selects the 4th completion candidate!
To get “A4” one could type something like A space BackSpace 4,
the space commits “A ”, then the BackSpace removes the extra “ ”
and then the 4 adds a “4” because now there is no preëdit.
Or type A Right 4, the arrow-right commits the preëdit and then
the 4 adds a “4” because now there is no preëdit.
To be able to type digits at all when digits are bound to commands in
the key bindings, digits are committed immediately when there is
no preëdit. But that makes it also impossible to type 2 and get it
completed to “2021”. As the “2” is committed immediately, no
completion can be tried.
Being able to type digits into the preëdit is also necessary if one wants to use the Unicode code point input feature.
If one wants to treat digits more like other keys and be able to type text containing digits into the preëdit, it is necessary to remove either the regular digits or the keypad digits from the keybindings, whichever you prefer.
You can also remove both from the keybindings if you want, that still
leaves you with the F1 … F9 keys to commit candidates.
On can of course also select the desired candidate by typing the keys
bound to the command “select_next_candidate” (by default Tab,
ISO_Left_Tab, Down, KP_Down) and then space. Personally, I use
that far more often than committing the candidate directly via its
number.
Key bindings for temporary emoji and word predictions
David Mandelberg contributed two new key-bindable commands:
trigger_emoji_predictions and trigger_word_predictions. These are
useful when you want predictions disabled by default but still wish to
request them temporarily while typing the next word.
For example, pressing the key bound to trigger_emoji_predictions will
enable emoji and Unicode character predictions only for the next
word you type. After that word is completed, predictions turn off
automatically. This differs from toggle_emoji_prediction, which
enables emoji and Unicode predictions indefinitely—requiring manual
disabling later.
Display Character or Selection Information
The show_selection_info command provides detailed information about either:
- The currently selected text
or, if no text is selected or if selection retrieval fails (it often fails on Wayland):
- The grapheme cluster immediately to the left of the cursor (a grapheme cluster might consist of several Unicode code points)
Example
If the cursor is positioned after 🧙🏽♀️| (where | marks the cursor), executing the command displays a candidate list like this:
(1/8)🔗
1 🧙🏽♀️ woman mage
2 ├─ 🧙 U+1F9D9 mage
3 ├─ 🏽 U+1F3FD emoji modifier fitzpatrick type-4
4 ├─ U+200D zero width joiner
5 ├─ ♀ U+2640 female sign
6 └─ U+FE0F variation selector-16
7 U+1F9D9 U+1F3FD U+200D U+2640 U+FE0F
8 🧙 U+1F9D9 mage 🏽 U…riation selector-16
Usage
- Press
Escapeto close the list. - Select a candidate to insert its information at the cursor position (useful for explaining Unicode characters or sequences).
Special Candidates
- The second-to-last candidate lists all code points in the analyzed text.
- The last candidate provides a full breakdown of each code point with names.
⚠️ Limitations on Wayland:
This feature works reliably on Xorg, but Wayland currently has some unresoved issues:
Selection Content Unavailable
🔗 GitHub Issue #2760: Typing Booster cannot retrieve selected text on Wayland using surrounding text.
Workaround:
Install the
wl-pasteprogram (On Fedora this is in thewl-clipboardpackage). Ifwl-pasteis available and getting the selection using surrounding text fails, usingwl-pasteto get the primary selection is attempted. This usually works.If getting the selection using
wl-pastefails as well orwl-pasteis unavailable getting the primary selection using Gtk4 is attempted.If all attempts to get the selection failed (or nothing was selected in the first place) surrounding text is used to get the character to the left of the cursor and show information about that character.
Cursor Position Not Updated After Mouse Movement
🔗 GitHub Issue #2765 When you move the cursor using the mouse in GNOME/Wayland:
- The surrounding text does not update the cursor position.
- Executing
show_selection_infowill show information for the character at the previous cursor position (before mouse movement).
Workaround:
After moving the cursor with the mouse, press ← then → (left/right arrow keys) to force a position update. The command will then work as expected.
Multilingual input
This video shows how to setup multiple dictionaries and input methods.
Ibus-typing-booster supports using more than one dictionary and more than one input method/transliteration at the same time.
That makes it possible to write text in more than one language without having to switch languages manually. If one often writes in different languages this can save a lot of input method switching.
This works not only when the languages use same script (like using English and Spanish at the same time), it works even when the languages use different scripts. For example when using English (Latin script) and Hindi (Devanagari script) at the same time. When using languages with different scripts at the same time, it is sometimes necessary to switch the input method for the preëdit (See the Hindi and English example). But even in such a more complicated case, switching is often not necessary, often one can select a suitable candidate without switching and save a lot of input method switches.
This video shows how dictionaries can be added using the “➕” button below the list of dictionaries in the “Dictionaries and input methods” tab of the setup tool.
The check marks (“✔️”) and the cross marks (“❌”) indicate whether a spellchecking dictionary and/or and emoji dictionary for that language/locale is currently available on your system. If a dictionary is shown with a cross mark (“❌”) as not available, that does not necessarily mean that it is not available at all for your system, maybe you just need to install an additional package.
For obscure technical reasons, the maximum number of dictionaries you can use at the same time is currently limited to 10. But that should be plenty, one should not overdo it, the more dictionaries one adds, the slower ibus-typing-booster becomes and the prediction quality suffers. So only add the dictionaries you really need.
This video also shows how input methods can be added to ibus-typing-booster using the “➕” button below the list of input methods in the “Dictionaries and input methods” tab of the setup tool.
Just like for the dictionaries, for obsure technical reasons the maximum number of input methods you can currently use at the same time is limited to 10. But that should be plenty.
One should only add as many input methods as one really needs, adding more would only slow down the system and reduce the accuracy of the predictions.
Near the end this video also shows how one can try to install missing dictionaries, i.e. dictionaries marked with a cross mark (“❌”) by clicking on the “Install missing dictionaries” button.
When this button is clicked, one can see a black box with the text “Additional Packages Required” “An application is requesting additional packages.” appearing near the top of the screen, just below the Gnome panel.
When clicking that black box, the package manager will try to install packages for the missing dictionaries, if possible. For “fr_FR” (French) and “es_ES” (Spanish) this will succeed on Fedora 34 and show options to install the “hunspell-fr” and the “hunspell-es” package. For “zh” (Chinese) and “ja_JP” Japanese this will not succeed, there are no hunspell dictionaries for these languages on Fedora 34. That does not mean that adding the “zh” and “ja_JP” dictionaries in the setup tool is pointless, the check mark (“✔️”) is shown after emoji. That means emoji dictionaries for these languages are available and even installed at the moment. So if you want to match emoji in Chinese or Japanese, these dictionaries could still be useful.
The button “Install missing dictionaries” uses the service offered by
the “Packagekit” daemon to try to install package. If the
packagekitd is not running, this will not work. The UI shown by
“Packagekit” differs a bit depending on whether you do this on Gnome,
XFCE, or something else. On some distributions, the names for the
packages containing the needed hunspell dictionaries might be
different causing this to fail. If this button doesn’t work, there is always
the option to install dictionaries using the command line, for example on
Fedora:
sudo dnf install hunspell-es hunspell-fr
Example using Hindi and English at the same time
This video shows how Hindi and English can be used at the same time in ibus-typing-booster.
If one uses both Hindi and English often, it is possible to setup ibus-typing-booster to use both languages at the same time. Then one can just type in either Hindi or English and ibus-typing-booster will show suitable candidates automatically.
In the “Dictionaries and input methods” tab of the setup tool one can see that two dictionaries have been added, “hi_IN” for Hindi and “en_GB” for British English. And two input methods have been added, “hi-itrans” to type Hindi and “NoIme” (“Native Keyboard”, i.e. direct keyboard input) to type English (How to setup dictionaries and input methods is described here.).
There are several input methods available for Hindi: “hi-inscript2”, “hi-inscript”, “hi-phonetic”, “hi-itrans”, “hi-remington”, “hi-typewriter”, and “hi-vedmata”. In this example we use “hi-itrans” but one could also use any of the others or even several at once.
If more than one input/transliteration method is enabled, the typed keys will be transliterated with each transliteration method and each transliteration result will be looked up in the enabled dictionaries and in the user database of previous input.
In this video, Hindi with the “hi-itrans” method and English are used at the same time. One can see in the preedit that the input “guru” has been typed. The candidate list shows both “गुरु” (which is the transliteration of the input “guru” using the “hi-itrans” method) and the English candidates “guru” and “gurus”. This is because both the transliteration “गुरु” and the direct input “guru” are used at the same time to lookup candidates.
Actually it is quite rare to see candidates from both Hindi and English in a candidate list. The English word “guru” is a loanword from Hindi, it is just the transliteration of the original Hindi word into the Latin Alphabet. Therefore, the “Itrans” method transliterates it back to Hindi and one gets a match in Hindi as well. Most English words do not transliterate to anything meaningful in Hindi and most Hindi input does not match anything in English either. The example “guru” is carefully chosen to show how ibus-typing-booster handles multilingual input.
In practice, as soon as one has typed a few characters, one will most of the time see only candidates from either Hindi or English, not both. I.e. the language one is typing in at the moment is automatically detected because one very rarely gets matches in the other language.
This automatic language detection works even better after ibus-typing-booster has learned from user input for a while. Because ibus-typing-booster remembers the context where the user has typed words.
Whether the preëdit (i.e. the current input, i.e. the underlined text next to the candidate list) shows Latin alphabet “guru” or Devanagari “गुरु” depends on which input method currently has highest priority, “NoIme” (which produces Latin alphabet) or “hi-itrans” which produces Devanagari.
Switching the priority of the input methods is sometimes necessary because one may not want to select any of the displayed candidates but commit the preëdit instead by typing a space. For example, if the preëdit is currently in English mode (direct input mode) and one types a Hindi word, it may happen that one does not get any matches in the candidate list, although the word has been typed correctly. This may happen if this word can neither be found in the dictionary nor in the user database because this word has never been typed before by the user. Nevertheless it may be a correct Hindi word of course and the user may want to commit it. But if the preëdit is currently in English mode, typing space would commit the Latin characters. So one has to switch the preëdit to “hi-itrans” first and then commit by typing a space.
The default key bindings to switch the input method for the preëdit are “Control+Down” and “Control+up”. With only two input methods as in the current example, both key bindings behave the same. But there can be more than two input methods and then “Control+Down” moves in one direction through the list of input methods and “Control+Up” in the other direction (see key and mouse bindings).
As an alternative to using the “Control+Down” and “Control+Up” key bindings, the priorities of input methods can also be switched using the menu in the gnome panel or using the setup tool.
In the setup tool, there is an option “☐ Remember last used preëdit input method”. If that option is disabled, ibus-typing-booster will always start using the input method with the highest priority as set in the setup tool for the preëdit when you log in to your desktop and use ibus-typing-booster for the first time after the login. In that case, changing the input method priorities with the key bindings or the Gnome panel has no permanent effect, it will not change the order in the setup tool in that case. With this option disabled, only changing the priorities directly in the setup tool has a permanent effect.
But if the option “☑️ Remember last used preëdit input method” is enabled, ibus-typing-booster will change the priority in the setup when you switch to a different input method for the preëdit using the key bindings or the Gnome panel. In the video it can be seen that the order of the input methods in the setup tool changes even though the “↑” and “↓” buttons in the setup tools have not been clicked but the key bindings or the menu in the Gnome panel have been used and this had an effect on the order shown in the setup tool because the option “☑️ Remember last used preëdit input method” was enabled during the video.
Example using Spanish and English at the same time
Using Spanish and English at the same time
This animated gif shows using ibus-typing-booster for Spanish and English at the same time. In the setup tool, dictionaries for Spanish (“es_ES”) and British English (“en_GB”) have been added. And two input methods “t-latn-pre” and “NoIme” (Native Keyboard, i.e. direct keyboard input) have been added. Actually using only “NoIme” would have been enough, both Spanish and English can be typed just fine with direct keyboard input with a suitable keyboard layout. Adding “t-latin-pre” makes it possible to type for example “~n” to get an “ñ”, i.e. using “t-latn-pre” one can type accented Latin charaters even when using a US English keyboard layout for example. But that is completely optional, one can use only “NoIme”, only “t-latn-pre”, or both, depending on what keyboard layout one wants to use and what is most convenient.
When the input typed is “Yo soy un h” where the last character, the “h” is still in preëdit (marked by the underline) and we see some suggestions how the word starting with “h” might continue.
The suggestions shown for this input are Spanish words, not English. This is because ibus-typing-booster has already been trained by similar user input before. Therefore, it already knows which word starting with “h” the user usually types following “soy un”. And these are Spanish words.
In the second line of the editor the user now types some English after finishing the Spanish sentence.
The input typed is now “I am h” and again the last character “h” is still in preëdit and some suggestions for words starting with “h” are shown.
This time, the suggestions for words starting with “h” are English, not Spanish. This is because the words typed before were “I am” and the user apparently types the suggested English words frequently after “I am”.
So ibus-typing-booster can often automatically show candidates from the correct language according to the context. This makes it quite efficient to type multiple languages.
One can add as many dictionaries as one likes, but adding more dictionaries than one really needs slows the system down unnessarily and reduces the prediction accuracy.
Compose support (About dead keys and the Compose key)
“Compose sequences” are sequences of keys containing so called “dead keys” or containing the “Compose key” or even both and usually one or more “normal” keys.
“Dead keys”
Some keyboard layout have so called “dead keys”. They are called “dead” because in traditional implementations like in the Compose sequence implementation of Xorg they seem to do nothing at first, i.e. they appear to be “dead”. For example when typing a dead “~”, nothing appears to happen but when a base character like “a” is typed next, an “ã” appears. Some more examples:
| Dead key sequence | Result |
|---|---|
~ a | ã U+00E3 LATIN SMALL LETTER A WITH TILDE |
~ ^ a | ẫ U+1EAB LATIN SMALL LETTER A WITH CIRCUMFLEX AND TILDE |
~ ␠ | ~ U+007E TILDE |
~ ~ | ~ U+007E TILDE |
~ @ | undefined sequence, i.e. no result |
But on several modern implementations, these keys are not so “dead” anymore, the behaviour is improved and something helpful is actually displayed while typing such sequences.
Xorg:
When using the Compose support of Xorg, for example when typing into an Xorg application like xterm (i.e. not a Gtk application) while not having configured any input methods systems like IBus, these dead keys are really “dead”, nothing is displayed until the dead key sequence is finished. Any illegal/impossible/undefined sequence is silently discarded, i.e. when typing something like dead
~@, nothing at all happens.MacOS:
Typing a dead
~shows the~and highlights it, when the key for the base characters is pressed, the final character appearsGtk, IBus, Typing Booster:
Similar to MacOS, these 3 implementations show the dead keys, highlight them, let the user correct unfinished sequences with BackSpace, and may do more helpful stuff with undefined sequences then just silently discarding them.
Some keyboard layouts make extensive use of dead keys. For example the British or American international layouts. In Linux (or FreeBSD, …) you can select the American international layout by selecting “English (US, international with dead keys)” in the setup of your desktop.
The “English (US, international with dead keys)” layout looks like this:
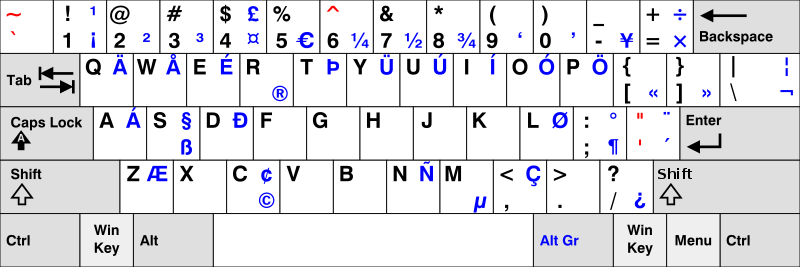
English (US, international with dead keys) (picture from Wikipedia)
The keys marked in red on this layout are “dead” keys.
Of course that “English (US, international with dead keys)” is not the only layout with dead keys, many national layouts use dead keys as well.
The “Compose” key
Wikipedia explains nicely what a Compose
key is. It is often also
called “multi key” (because the keysym defined in
/usr/include/X11/keysymdef.h is XK_Multi_key).
Some examples for Compose sequences involving a Compose key:
| Compose sequence involving Compose key | Result |
|---|---|
compose ~ n | ñ U+00F1 LATIN SMALL LETTER N WITH TILDE |
compose o c | © U+00A9 COPYRIGHT SIGN |
compose 1 2 | ½ U+00BD VULGAR FRACTION ONE HALF |
compose - - - | — U+2014 EM DASH |
compose n o n s e n s e | probably undefined sequence, i.e. no result |
The default Compose key on Xorg seems to be Shift+AltGr, but it maybe
on some other key depending on you keyboard layout.
In some desktops, for example in Gnome3, you can also easily choose which key to use for Compose in the system settings. The following example video shows how to do that in Gnome3 on Fedora 34:
“Dead key sequences” and “Compose sequences” are basically the same thing as far as Xorg, Gtk, IBus, and Typing Booster are concerned.
Xorg:
Displays nothing while the sequence is typed, only the final result is displayed. Undefined sequences are silently discarded.
Gtk, IBus, Typing Booster:
Try to be more helpful and display a Compose or dead key sequence in progress, allow fixing sequences with BackSpace, do something more useful with undefined sequences and more …
The official “ISO keyboard symbol for “Compose Character”” according to this Wikipedia article is ⎄ U+2384 COMPOSITION SYMBOL.
The compose sequence implementations in Gtk, IBus, and Typing Booster
used to display that symbol, for example when compose ~ was typed,
⎄~ was displayed
indicating the unfinished compose sequence.
Unfortunately some people found ⎄ to big, wide and distracting 😭.
Therefore, Gtk changed to display compose as · (· U+00B7 MIDDLE
DOT). And, a leading · is only displayed until the next character has
been typed, then vanishes!
Examples how Gtk now displays compose and dead key sequences:
| Typed compose sequence | Display |
|---|---|
compose | · |
compose - | - |
compose - - | -- |
compose - - - | — (sequence finished, — U+2014 EM DASH is displayed) |
dead ~ | ~ |
dead ~ compose | ~· |
dead ~ compose b | ~·b |
dead ~ compose b a | ẵ (sequence finished, ẵ LATIN SMALL LETTER A WITH BREVE AND TILDE is displayed. Yes, that sequence actually exists in /usr/share/X11/locale/en_US.UTF-8/Compose 😁) |
IBus and Typing Booster then also changed and followed the way Gtk displays this to have a consistent user experience across these 3 compose sequence implementations.
Customizing compose sequences
The man page for compose (Also
available as man compose on most distributions) explains from which
file the default compose sequence definitions are read and how a user
can override it with his own compose sequence definitions.
This man page says:
The compose file is searched for in the following order:
If the environment variable $XCOMPOSEFILE is set, its value is used as the name of the Compose file.
If the user’s home directory has a file named .XCompose, it is used as the Compose file.
The system provided compose file is used by mapping the locale to a compose file from the list in /usr/share/X11/locale/compose.dir.
For example, when XCOMPOSEFILE is not set, ~/.XCompose does not
exist either and the current locale is cs_CZ.UTF-8, then the system
default compose sequence definitions are read from
/usr/share/X11/locale/cs_CZ.UTF-8/Compose. When the current locale
is something like xx_YY.UTF-8 where no
/usr/share/X11/locale/xx_YY.UTF-8/Compose file specific to that
locale exists, the US English one
/usr/share/X11/locale/en_US.UTF-8/Compose is read (These fallbacks
are defined in /usr/share/X11/locale/compose.dir).
However, if the users home directory has a file named ~/.XCompose or
if the environment variable XCOMPOSEFILE is set, only that file
is used instead of the system default.
For example, a user Compose file ~/.XCompose could look like this:
# %H  expands to the user's home directory (the $HOME environment variable)
# %L  expands to the name of the locale specific Compose file (i.e.,
#     "/usr/share/X11/locale/<localename>/Compose")
# %S  expands to the name of the system directory for Compose files (i.e.,
#     "/usr/share/X11/locale")

include "/%L"  # The leading / is to make Gtk load the system compose file!

<Multi_key> <underscore> <period> <e> : "ė̄" # U+0117 LATIN SMALL LETTER E WITH DOT ABOVE U+0304 COMBINING MACRON
<Multi_key> <m> <o> <n> <k> <e> <y> <s> : "🙈🙉🙊"
<Multi_key> <m> <o> <u> <s> <e> : "🐁" # U+1F401 MOUSE
<Multi_key> <m> <o> <u> <s> <e> : "🐭" # U+1F42D MOUSE FACE
# In en_US.UTF-8 locale, the system compose file
# /usr/share/X11/locale/<localename>/Compose included above contains
#     <Multi_key> <p> <o> <o>                 : "💩"  U1F4A9 # PILE OF POO
# One can remove unwanted compose sequences by re-defining them with
# an empty result:
<Multi_key> <p> <o> <o> : "" # Remove unwanted compose sequence
The include "/%L" includes the system compose file for the current locale,
the lines below add user defined sequences. If an identical sequence
are defined again with a different result, the last definition “wins”.
I.e. of the two lines defining <Multi_key> <m> <o> <u> <s> <e>,
the second line overrides the first one.
As the user definitions are all below the include "/%L" which
reads the system default, the user definitions override any system
default sequences in case there is a conflict.
If the include "/%L" were not there in ~/.XCompose, only the
user definitions in ~/.XCompose would be available!
💡 Tiny extensions of the syntax described in man page for compose:
Gtk and Typing Booster
Both Gtk and Typing Booster make it possible to remove unwanted compose sequences by re-defining them as sequences with an empty result like:
<Multi_key> <p> <o> <o> : ""That does not mean that this sequence still exists and just produces an empty result, the effect is as if the sequence
<Multi_key> <p> <o> <o>had not been defined at all.Only Gtk
The
include "%L"statement in Gtk has the special meaning to include the builtin compose sequences of Gtk. It does not include the system compose file/usr/share/X11/locale/<localename>/Compose. If you use the compose support in Gtk and want to use the locale specific system compose file, you can useinclude "/%L". The leading/forces loading the locale specific system compose file. For the compose support in Typing Booster and IBus, the leading/makes no difference.
Special “Compose” features in Typing Booster
This section explains some details about the “Compose” implementation in Typing Booster which are a bit special.
Why Typing Booster has its own “Compose” implementation
Typing Booster needed its own implementation of compose sequences because it needs full control about such compose sequences inside an already open preëdit.
For example, if one wants to type the German word “grün” and starts typing “gr”, there is a preëdit displayed as
gr|
where | indicates the cursor
position. Typing Booster then searches for completions. When a compose
sequence like compose " u is typed in this situation to get an
“ü”, the current preëdit must not be committed, but the compose
actually needs to add to the preëdit. That means a kind of preëdit
inside the preëdit is needed. While that compose sequence is typed it
displays:
gr·|
gr"|
grü|
Now “grü” is still in preëdit and Typing Booster can continue to search for completions of “grü”.
One could even go back with Left (arrow-left) in the preëdit and insert a compose sequence there. For example, if one types “grn” and then Left, the preëdit displays
gr|n
Typing compose " u then displays:
gr·|n
gr"|n
grü|n
Now “grün” is in the preëdit and Typing Booster can continue to search for completions.
Automatically add “missing” dead key sequences
To write the character ė̄ (U+0117 LATIN SMALL LETTER E WITH DOT ABOVE
U+0304 COMBINING MACRON) which is used for writing
Samogitian
it would be perfectly natural to write dead ¯ dead ˙ e or dead ˙ dead ¯ e.
But the Compose implementations in Xorg and IBus accept only dead key
sequences which are defined in one of the Compose files read. And
there are no such dead key sequences defined in
/usr/share/X11/locale/en_US.UTF-8/Compose. Therefore, the Compose
implementations in Xorg and IBus currently just discard sequences like
dead ¯ dead ˙ e as undefined and produce no result at all.
That means to be able to write these perfectly natural and useful dead key sequences, one would need to add something like
<dead_macron> <dead_abovedot> <e> : "ė̄ " # U+0117 LATIN SMALL LETTER E WITH DOT ABOVE U+0304 COMBINING MACRON
<dead_abovedot> <dead_macron> <e> : "ė̄ " # U+0117 LATIN SMALL LETTER E WITH DOT ABOVE U+0304 COMBINING MACRON
to the users ~/.XCompose file and/or extend the system default file
/usr/share/X11/locale/en_US.UTF-8/Compose.
But the character from Samogitian used as an example here is not the
only character which could be reasonably written with dead key
sequences but the sequences are missing in
/usr/share/X11/locale/en_US.UTF-8/Compose.
Adding all such sequences which might make sense for some language somewhere in the world would be a tedious, never ending project. Hundreds, if not thousands of sequences would need to be added.
So why not interpret any dead key sequence which seems reasonable
but is not defined in the Compose file automatically as a fallback?
I.e. if the user types something like dead ¯ dead ˙ e and no
definition for <dead_macron> <dead_abovedot> <e> is found in the
Compose file(s) read, then interpret this “missing” sequence
nevertheless and produce something reasonable.
Typing Booster does this, if a sequence like
dead first dead second … dead last base character
is typed and no definition is found in the Compose file(s),
and the Unicode category of base character is either “Ll
(Letter, Lowercase)” or “Lu (Letter, Uppercase)”, then convert it into
a combining char sequence like
base character combining char last … combining char second combining char first
convert this combining character sequence to Normalization Form C (NFC) and use that as the result of the undefined dead key sequence?
That is very helpful and automatically adds a huge amount of perfectly reasonable dead key sequences which are “missing” in the Compose files.
If a definition exists in the Compose file(s) read, this definition has always priority, only if no definition exists this automatic fallback is used.
Fallbacks for “missing” keypad sequences
From a user point of view, it should not matter whether
a character like 0, 1, …,9, /, *, -, +, . is typed
using the “normal” key or the respective key on the keypad/numberpad.
But in the Xorg Compose file, some compose sequences can be typed only using the “normal” key. For example:
$ grep Ø /usr/share/X11/locale/en_US.UTF-8/Compose
<dead_stroke> <O>                       : "Ø"   Oslash # LATIN CAPITAL LETTER O WITH STROKE
<Multi_key> <slash> <O>                 : "Ø"   Oslash # LATIN CAPITAL LETTER O WITH STROKE
<Multi_key> <O> <slash>                 : "Ø"   Oslash # LATIN CAPITAL LETTER O WITH STROKE
<Multi_key> <KP_Divide> <O>             : "Ø"   Oslash # LATIN CAPITAL LETTER O WITH STROKE
and:
$ grep ½ /usr/share/X11/locale/en_US.UTF-8/Compose
<Multi_key> <1> <2>                     : "½"   onehalf # VULGAR FRACTION ONE HALF
I.e. one can type both orders <Multi_key> <slash> <O> and
<Multi_key> <O> <slash> to get “Ø” but when using KP_Divide instead
of slash only the order <Multi_key> <KP_Divide> <O> works and
<Multi_key> <O> <KP_Divide> does not work because it is
undefined. From a user point of view, both “<Multi_key> <KP_Divide> <O> to
give the same result as <Multi_key> <slash> <O>, it should not
matter how the “/” is typed. But the reverse order <Multi_key> <O> <KP_Divide> has apparently been “forgotten”.
It is similar when typing “½” using Compose, one can type it with
compose 1 2 only using the “normal” 1 and 2 keys but not
using those on the keypad.
This doesn’t really make sense and I tried to make a merge
request
for libX11 upstream to add the apparently missing definitions. But
this is a quite tedious undertaking, although my merge request tries
to add 246 “missing” definitions and I tried to find all missing
sequences, I still forgot to add a few sequences like the alternatives
to <Multi_key> <1> <2> using the keypad keys like <Multi_key> <KP_1> <KP_2>, <Multi_key> <KP_1> <2>, <Multi_key> <1> <KP_2>.
So I added an automatic fallback to Typing Booster which works like this:
If something like <Multi_key> <KP_1> is typed and no sequence
starting like that is defined, try whether sequences starting with
<Multi_key> <1> can be found, if yes replace <KP_1> with <1> and
continue to interpret the sequence.
And the other way round: if something like <Multi_key> <1> is typed
and no sequence starting like that is defined, try whether sequences
starting with <Multi_key> <KP_1> can be found, if yes replace <1>
with <KP_1> and continue to interpret the sequence.
My current implementation of these fallbacks does still make a
difference between typing <Multi_key> <KP_Divide> and <Multi_key> <slash> for example, because sequences starting both ways do
actually exist in the Compose file, but the number of possible
continuations is different. <Multi_key> <slash> can be completed in
38 different ways but <Multi_key> <KP_Divide> can be completed only
in 27 different ways:
$ grep '^<Multi_key> <slash>' /usr/share/X11/locale/en_US.UTF-8/Compose | wc --lines
38
$ grep '^<Multi_key> <KP_Divide>' /usr/share/X11/locale/en_US.UTF-8/Compose | wc --lines
27
I.e. when typing <Multi_key> <KP_Divide>, Typing Booster currently does not
attempt to replace <KP_Divide> with <slash> because
sequences starting with <Multi_key> <KP_Divide> actually are defined!
So there are sometimes still subtle diffences between using the “normal”
and the keypad keys, typing <Multi_key> <KP_Divide> offers fewer
possibilities than typing <Multi_key> <slash> does.
Of course Typing Booster could easily treat “normal” and keypad keys as 100% identical always in compose sequences. I did not do that because I wanted to keep the possibility to define really different results for sequences involving the “normal” versus the keypad keys.
For example, with my current implementation, it is still possible to possible to define something like this
<Multi_key> <1> <2>                     : "½"
<Multi_key> <KP_1> <KP_2>               : "1️⃣2️⃣"
i.e. to define different results for a sequence using the “normal” keys and for the similar sequence using the keypad keys. Seems a bit crazy to me, I cannot imagine why somebody would want to define something like that, but there might be reasons for wanting to make such differences and I didn’t want to take away that possibility.
Just as in Automatically add “missing” dead key sequences, if a definition exists in the Compose file(s) read, this definition has always priority, only if no definition exists Typing Booster tries to be helpful and offers a reasonable fallback.
How undefined sequences are handled
When an undefined compose or dead key sequence is typed using Xorg/libX11, the result is nothing at all, the sequence is just silently discarded. This can be tested by using xterm like this:
$ env XMODIFIERS=@im=none xterm
Setting XMODIFIERS to @im=none disables input methods like ibus,
i.e. this makes sure that the Compose implementation in Xorg/libX11 is
used.
IBus 1.5.24 does the same as Xorg when an undefined compose sequence
is typed, nothing happens, the sequence is silently discarded. To
test the Compose implementation in IBus, make sure that the
ibus-daemon is running, configure a keyboard layout with the needed
dead keys in ibus-setup, then switch to that keyboard layout and
test for example in gedit.
Gtk3 tries to be more helpful and instead of silently discarding the sequence
do something more useful.
The Compose implementation in Gtk3 can be tested by using gedit like this:
$ env GTK_IM_MODULE=gtk-im-context-simple gedit
Typing Booster also tries to be more helpful and do something more useful than just discarding the undefined sequence.
This table shows some examples for undefined compose sequences and what the result is when typing the sequence in the 4 different compose implementations:
| Undefined compose sequence | Xorg (libX11 1.7.2) | IBus 1.5.24 | Gtk3 3.24.30 | Typing Booster 2.14.4 |
|---|---|---|---|---|
dead_circumflex @ | nothing | nothing | ^@ | ^ (keep dead_circumflex in preëdit and beep) |
dead_circumflex x | nothing | nothing | ^x | x̂ (x + ̂ U+0302 COMBINING CIRCUMFLEX ACCENT) (Because of automatic dead key fallback) |
dead_macron dead_abovedot e | nothing | nothing | ¯ ̇e | ė̄ (ė U+0117 LATIN SMALL LETTER E WITH DOT ABOVE + ̄ U+0304 COMBINING MACRON) (Because of automatic dead key fallback) |
compose - - x | nothing | nothing | nothing | – (keep compose - - in preëdit and beep) |
compose KP_1 KP_2 | 2 ( compose KP_1 produces nothing, then KP_2 produces “2”) | 2 ( compose KP_1 produces nothing, then KP_2 produces “2”) | 2 ( compose KP_1 produces nothing, then KP_2 produces “2”) | ½ (Because of fallback for “missing” keypad sequences it falls back to the defined sequence compose 1 2) |
The behaviour of Typing Booster for undefined compose sequences is:
If that didn’t help, discard only the key which made the sequence invalid, keep the valid part of the sequence in preëdit, and play an error beep.
When hearing the error beep, the user can then type Tab to show how the sequence could be completed.
Show possible completions of compose sequences
This video shows how possible completions of partially typed compose sequences can be displayed by typing a key bound to the command “enable_lookup” (by default that is [‘Tab’, ‘ISO_Left_Tab’]).
First the keyboard layout “English (US, euro on 5)” is selected, then “Typing Booster” (Typing Booster always uses the keyboard layout which was used last before switching to Typing Booster!).
Then compose - is typed.
(Look here for details about what the compose key is and to see a video showing how to choose a compose key in Gnome3).
The compose sequence compose - is not complete yet.
Now Tab is typed and a candidate list pops up showing how this incomplete
compose sequence could be completed. There are 29 possible completions.
For example, in the first page of possible completions one can see:
(1/29)
1 ␠     ~       U+007E tilde
2 (     {       U+007B left curly bracket
3 )     }       U+007D right curly bracket
4 +     ±       U+00B1 plus-minus sign
5 ,     ¬       U+00AC not sign
6 /     ⌿       U+233F apl functional symbol slash bar
7 :     ÷       U+00F7 division sign
8 >     →       U+2192 rightwards arrow
9 A     Ā       U+0100 latin capital letter a with macron
The first column after the numbers of the candidates show the keys which could be typed to continue the compose sequence, the second column shows what the result would be and the third column shows detailed Unicode information about that result.
So candidate number 4 tells us, that typing compose - + would
produce a “±”.
One can of course select a candidate as always from such a candidate list. Or cancel the candidate list by typing Escape and continue typing.
If something was selected already in the candidate list, indicated by the a blue background in Gnome3, the first Escape just cancels that selection, the second Escape then closes the candidate list. If nothing is selected, Escape closes the candidate list immediately. Continuing to type the compose sequence while nothing is selected in the candidate list, also closes the candidate list.
Next, in the video, the Page_Down and Page_Up keys are used
to scroll through the candidate list and see what is available
as completion for the unfinished compose sequence compose -.
Then, Escape is typed to cancel the selection and another - is typed.
Now we have the still unfinished compose sequence compose - -.
Another Tab brings up a list of possible completions for this unfinished sequence.
(1/3)
1 ␠ U+00AD soft hyphen
2 - — U+2014 em dash
3 . – U+2013 en dash
So typing the complete sequences compose - - space would give the “soft hyphen”,
compose - - - the “em dash”, compose - - . the “en dash”.
In the video, candidate number 2, the “em dash” is selected with the mouse.
Next compose ' is typed followed by Tab. We see that there are 68 possible completions.
In the video Page_Down and Page_Up are used again to scroll through the completions,
then the selection is cancelled with Escape, then an A is typed to
complete the compose sequence: compose ' A gives “Á”.
Next, in the video, the Greek keyboard layout is chosen in the Gnome panel, then “Typing Booster” is chosen again. Typing Booster now uses a Greek keyboard layout because that was the last active one.
Again compose ' is typed and then Tab to show the possible completions of the
unfinished compose sequence.
Now we have 154 possible completions, much more than the 68 when we were using the “English (US, euro on 5)” layout! Why is that? To avoid always showing many hundreds of completions, Typing Booster shows only those which are actually possible to type on the current keyboard layout. If the current keyboard layout does not have a certain key, completions involving that key are not shown.
Scrolling down to one of the last pages of candidates shows:
(127/154)
…
8 💀᾿α  ἄ       U+1F04 greek small letter alpha with psili and oxia
…
I.e. it is possible to type a “ἄ” (U+1F04 GREEK SMALL LETTER ALPHA WITH PSILI AND OXIA)
by typing compose ' 💀᾿ α.
The 💀᾿ indicates a “dead psili”. Some keyboard layouts have both a
dead version of a key and also the non-dead version of a key. For
example a layout may have a “tilde” and also a “dead tilde” key.
It is necessary to distinguish that and press the correct key, either
the dead or non-dead key while typing a compose sequence. Therefore,
the candidates showing the possible compose completions make that
distiction by showing dead keys with a 💀 prefix. I.e. ~ is a
normal tilde, 💀~ is a “dead” tilde.
While the “English (US, euro on 5)” was used, 💀᾿ α was not shown
as a possible completion for compose ' because that keyboard
layout neither has the dead psili nor the “α”.
Finally, in the video, that candidate number 8, “ἄ” is selected using the mouse.
A peculiarity of Gnome3 and compose completions
This chapter is specific to Gnome3, as far as I know none of the other desktops does this weird grouping of keyboard layouts in groups of 3.
You may have noticed that there were more than 2 keyboard layouts in the Gnome panel. The Gnome panel showed:
| Input source name | indicator | comment |
|---|---|---|
| English (US, euro on 5) | en₁ | keyboard layout |
| Other (Typing Booster) | 🚀 | input engine |
| Japanese (Anthy) | あ | input engine |
| English (India, with rupee) | en₂ | keyboard layout |
| English (US) | en₃ | keyboard layout |
| Greek | gr | keyboard layout |
So there were 4 keyboard layouts and 2 input engines. The first 3 keyboard layouts were all minor variations of the “English (US) layout”, they differ very little in which keys are available.
The Greek layout is then the 4th layout. Gnome3 groups layouts into groups of 3, i.e. the first group of layouts contains the 3 US English layouts, the second group only the Greek layout.
This grouping of keyboard layouts in Gnome3 has the side effect that
calling the function Gdk.Keymap.get_for_display(display) to find out
which keys are available on the current layout returns all keys
available in the current group of 3 layouts!
I.e. when “English (US, euro on 5)” is selected, the list of keys used to figure out which compose sequences are possible to type with the current layout are actually the combined lists of keys of “English (US, euro on 5)” and “English (India, with rupee)” and “English (US)”. Which is not a much bigger list of keys than any of these US English layouts on its own as the differences between these 3 layouts are very small. I did choose 3 almost identical layouts in the first group of 3 on purpose to be able to demonstrate in the video in the previous section how showing the compose completions is limited to the current layout.
If I had use a setup with only these input sources:
| Input source name | indicator | comment |
|---|---|---|
| English (US, euro on 5) | en | keyboard layout |
| Other (Typing Booster) | 🚀 | input engine |
| Japanese (Anthy) | あ | input engine |
| Greek | gr | keyboard layout |
both “English (US, euro on 5)” and “Greek” would have been in the first group of 3 keyboard layouts and no matter whether the “English (US, euro on 5)” or the “Greek” was active, the possible compose completions shown would have always included all keys from both the English and the Greek layout!
Optional colour for the compose preëdit
The video shows how a different colour can be chosen for the compose part of the preëdit.
First the option “☐ Use color for compose preview” is switched off.
Then “sur” is typed and then two times Left to move the cursor back behind
the “s”. Then compose o e is typed which produces an “œ” to turn this
into the French word “sœur”. While typing this, the preëdit changes as follows:
“s” → “su” → “sur” → “s·ur” → “sour” → “sœur”
Then the option “☑️ Use color for compose preview” is switch on again and the same typing is repeated. Now the preëdit changes as follows:
“s” → “su” → “sur” → “s·ur” → “sour” → “sœur”
Without the colouring of the compose part of the preëdit, it is hard to see
that “sour” actually still contains an unfinished compose sequence, especially
because the · (U+00B7 MIDDLE DOT) representing the compose key has vanished.
Using colour in the compose part of the preëdit makes it much more obvious which part of the preëdit was already there before the compose sequence was started and which part is an unfinished compose sequence.
Unicode symbols and emoji predictions
ibus-typing-booster supports prediction of emoji and Unicode symbols as well (actually almost all Unicode characters except letters can be typed this way). This can be enabled or disabled with the option “Emoji predictions” in the setup tool which is on by default.
To make all emoji display correctly, you need good fonts which contain all emoji, see Emoji fonts for details about available fonts and font setup.
Emoji input
When the “☑️ Unicode symbols and emoji predictions” option is on (it is off by default), you get emoji displayed in the candidate list automatically when typing something which matches an emoji.
For example in this video, the user has types “camel”, “Albania”, and “castle” and suitable emoji are shown in the candidate list.
If reasonable matches for emoji are found, the first match is shown as the last candidate of the first page of the candidate list (Unless, as in the case of “Albania”, the candidate list has only one page, then it might not be the last candidate).
If more than one emoji has matched the input and the candidate list has more than one page, the other matches can be found by scrolling down to the next page of candidates. If an emoji is selected and committed, it will be remembered just like ibus-typing-booster remembers other words and will be shown with higher priority next time.
As having the “☑️ Unicode symbols and emoji predictions” option enabled slows down the search for predictions, you might want to look at Quickly toggling emoji mode on and off, especially if you use emoji only occasionally.
Emoji input fuzzy matching
Fuzzy emoji matching using the Enchant spellchecker has been removed from ibus-typing-booster ≥ 2.27.52, as it caused more problems than it solved. For example, searching for Syriac characters by typing “syriac” incorrectly matched the 💉 (U+1F489 SYRINGE) emoji with the highest score.
While the new emoji search no longer performs spellchecking, it works significantly better than before—especially with multiple search terms that rely on substring matches. For instance, even though “casle” no longer yields results, a short substring like “cas” is now sufficient to match a castle emoji.
Additionally, to find a specific castle emoji, users can now combine multiple short substrings with underscores or spaces. For example:
The search term “cas_eur” matches 🏰 (U+1F3F0 EUROPEAN CASTLE).
The search term “cas_jap” matches 🏯 (U+1F3EF JAPANESE CASTLE).
(The old search struggled with such short partial matches.)
On top of these improvements, the new emoji search algorithm is much faster.
If users cannot find a desired emoji or character due to misspelled
names or keywords, they can still use emoji-picker --spellcheck. By
default, emoji-picker no longer uses spellchecking either, but the old
spellcheck-based search remains available as an option.
I chose not to add the old spellchecking search to Typing Booster as I found it largely ineffective.
Emoji input using multiple keywords
This video shows how to use multiple keywords to search for emoji.
If typing a single word does not give you the emoji you are looking for, you can type as many keywords as you like and concatenate them with underscores “_” (Or spaces “ ”. Typing space usually commits the preëdit, but you can insert literal spaces into the preëdit by typing AltGr+Space).
In a previous example, typing “castle” gave us the match 🏰 (U+1F3F0 EUROPEAN CASTLE). If this is not what we wanted we can type “castle_japanese” (or “japanese_castle”) to get 🏯 (U+1F3EF JAPANESE CASTLE).
Looking up related emoji
It is also possible to look up related emoji which may not have matched the typed text well but are related to the emoji shown because they share keywords or categories.
To show related emoji, click an emoji shown in the candidate list with the right mouse button (see Mouse bindings).
Or, if you prefer to use a key binding instead of the mouse: select an emoji in the candidate list by moving up or down in the candidate list using the arrow-up/arrow-down keys or the page-up/page-down keys until the desired emoji is highlighted, then press AltGr+F12.
AltGr+F12 is the default key binding for the command “lookup_related”. If you press this while no candidate is selected, a lookup of related stuff for the preëdit is tried. In this case, the preëdit contains the text “liz” which is not an emoji. So no related emoji will be found. But if NLTK is used, related words for “liz” may be shown, see Using NLTK to find related words.
As seen in the screen shot, looking up related emoji for the “lizard” gives us emoji for other types of reptiles and related animals. By typing the “Escape” key, one can go back to the original list.
Multilingual emoji input
Emoji input using German and English
In this example video, Typing Booster is used with dictionaries setup for British English and German in the setup tool.
Therefore, one can use both the English word “castle” or the German word for castle “Schloss” to find castle emoji.
The German word “Schloss” means “castle” but also “lock”. Therefore, typing “Schloss” not only matches 🏰 (U+1F3F0 EUROPEAN CASTLE) and 🏯 (U+1F3EF JAPANESE CASTLE but also 🔓 (U+1F513 OPEN LOCK) and other lock emoji.
Emoji input using Hindi and English
This example video shows using Hindi and English to lookup emoji.
Both languages are configured in the setup tool (See: Basic setup for your language)
First “namaste” is typed. The transliteration method “hi-itrans” transliterates this to “नमस्ते” which is shown in the preëdit because the “hi-itrans” input method is at the highest priority (For details about multilingual input and how to switch the script shown in the preëdit, see Multilingual input).
Both “namaste” and “नमस्ते” are then used to search for matching words and emoji. Only “नमस्ते” matches an emoji which can be seen in the candidate list (🙏 U+1F64F PERSON WITH FOLDED HANDS and skin tone variants of this emoji).
Second, “folded_hands” is typed. As the highest priority input method is still “hi-itrans”, this is shown as nonsensical Devanagari in the preëdit. But both this nonsensical Devanagari and “folded_hands” are used to find matches and “folded_hands” finds 🙏 and skin tone variants as well.
Typing Control+Down then changes the priority of the input methods and puts “NoIME” on top which reveals that “folded_hands” was actually typed as this is now shown in the preëdit.
Emoji input using Japanese
This video shows that emoji can be searched using Japanese keywords as well.
To be able to input emoji using their Japanese names, one first needs
to install the packages m17n-db-extras, m17n-lib-anthy and anthy
on Fedora. On Fedora 36 one can do this using the command:
sudo dnf install m17n-db-extras m17n-lib-anthy
This should work on other distributions as well, but the package names
may be different. You need the package which contains the
/usr/share/m17n/ja-anthy.mim file and other packages which are
required to make the ja-anthy input method of the m17n library work.
Then one needs to add the “ja-anthy” input method and the Japanese dictionary (“ja_JP”) to the setup of ibus typing booster. For details how to add input methods and dictionaries see Basic setup for your language.
Now one can type emoji keywords using Japanese. For example when typing “katasumuri” (which means “snail”), one gets the emoji 🐌 (U+1F40C SNAIL) listed as a candidate.
It is labelled in the candidate list in Japanese hiragana syllables, i.e. “かたつむり”. The Latin “katatsumuri” was transliterated by the ja-anthy input method to “かたつむり” and this was then looked up in the dictionaries. The Latin text “katatsumuri” was of course looked up as well but of course produced no match.
Switching the priority of the input methods with “Control+Down” or “Control+Up” toogles the display of the preedit between Latin letters “katatsumuri” (when “NoIME” has highest priority) and Hiragana letters “かたつむり” (when “ja-anthy” has highest priority). This makes no difference for the matches, still both “katatsumuri” and “かたつむり” are looked up in the dictionaries. Only when committing the preëdit now by typing a space, it would matter because it would commit the Hiragana “かたつむり” or the Latin “katatsumuri” as seen in the moment when the space is typed.
Near the end of the video, a right click with the mouse on the snail in the candidate list shows related emoji. These related emoji are labelled with English names because the British English dictionary has highest priority in the setup tool. When the Japanese dictionary had the highest priority in the setup tool, the related emoji would be shown with their Japanese names.
Emoji input using Japanese or Chinese phonetics
The chapter Emoji input using Japanese described how one can search for emoji using the Japanese input method “ja-anthy”. But this has a few disadvantages:
- the packages containing “ja-anthy” may be missing on your distribution
- One can only type hiragana easily using “ja-anthy” in Typing Booster.
⚠️ Sidenote: It is not completely impossible to convert hiragana to kanji with “ja-anthy” in Typing Booster. But I don’t want to describe how to do this in detail here because it is very difficult and not really useful in practice.
When it is not easy to type katakana or kanji, some emoji which have names or keywords in katakana or kanji can not be found easily.
For example the snail emoji in Japanese has the keywords:
🐌 かたつむり | でんでん虫 | 虫
It is still quite easy to find this snail emoji even if one can only type hiragana because one of the keywords of this snail emoji is かたつむり which is completely in hiragana. Typing the other two keywords でんでん虫 or 虫 is already quite difficult with “ja-anthy” in Typing Booster.
But many emoji have no keywords written purely in hiragana at all, for example the “woman police officer”:
👮♀️ お巡りさん | 女性 | 女性警察官 | 警官 | 警察 | 警察官
The situation is very similar in Chinese, it is very hard to type Chinese with Typing Booster.
So it would be nice if one could just enter the phonetic transcription of Japanese or Chinese to Latin letters to search for such emoji keywords.
To make this phonetic transcription emoji search available, one can install the Python modules “pykakasi” for Japanese and “pinyin” for Chinese.
These are not available as packages in Fedora 36 but they can easily be installed using “pip install” like this:
For Japanese:
pip install --user pykakasi
For Chinese:
pip install --user pinyin
If these Python modules are installed, Typing Booster and Emoji Picker will use them automatically if Japanese or Chinese emoji dictionaries are used.
In Japanese, the keywords for the “woman police officer” are then automatically expanded to:
👮♀️ お巡りさん, おめぐりさん, 女性, じょせい, 女性警察官, じょせいけいさつかん, 警官, けいかん, 警察, けいさつ, 警察官, けいさつかん, omegurisan, josei, joseikeisatsukan, keikan, keisatsu, keisatsukan
And in Chinese they are expanded to:
👮♀️ 女, nv̌, 女警察, nv̌jǐngchá, 警官, jǐngguān, 警察, jǐngchá
As these expansions now contain Latin transliterations, searching emoji via their Latin transliteration of Japanese or Chinese now works as well.
As the search is accent insensitive, it is enough to type “nvjingcha” to find the “woman police officer” in Chinese, one does not need to include the tone marks, i.e. one does not need to type “nv̌jǐngchá”.
Unicode symbol input
This video example shows how arbitrary Unicode symbols and characters can be input with Typing Booster.
Using the emoji input mode of Typing Booster, one cannot only input emoji but other Unicode symbols as well. Actually almost all Unicode characters can be typed this way (Except most letters, because letters can usually typed much faster directly, allowing to search for normal letters this way would make the search needlessly slow).
In the video, first “integral” is typed and one gets several mathematical characters for integrals in the candidate list and can scroll down to the next pages for more.
If one wants to be more specific, one can also type more than one keyword by combining keywords with “_” (see Emoji input using multiple keywords). For example one can type something like “volume_integral” to get more specific matches for integral signs related to volume integrals.
Next “pop_direc” is typed which matches U+202C POP DIRECTIONAL FORMATTING and U+2069 POP DIRECTIONAL ISOLATE. These are invisible formatting characters used in scripts which use right-to-left direction, for example in Arabic script.
Finally “radical_turtle” is typed which finds the CJK radicals for “turtle”.
Anything in Unicode except normal letters is possible.
Unicode code point input
This example video shows how the “☑️ Unicode symbols and emoji predictions” feature of Typing Booster can also be used to input characters using their Unicode code point.
As Unicode code points are hexadecimal numbers, it is first necessary to make it possible to input digits at all into the preëdit. By default, both the digits on the regular keyboard layout and the digits on the keypad are bound to commands committing candidates. See Customizing key bindings using digits about changing that.
The video shows the key bindings tab of the setup tool and one can see that there are no KP_1 … KP_9 keys used in the commands to commit candidates. So the keypad with NumLock on can be used to type digits into the preëdit.
First “100” is typed in the video. It matches 💯 U+1F4AF HUNDRED POINTS SYMBOL which is an emoji which has been matched because of its alternative name “100” and Ā U+0100 LATIN CAPITAL LETTER A WITH MACRON which has been matched because it has the Unicode code point 100 (hexadecimal). It is quite rare that typing a Unicode code point matches an emoji as well. There will never be many candidates when typing Unicode code points.
Then “2019” is typed which matches ’ U+2019 RIGHT SINGLE QUOTATION MARK.
Then “20B9” is typed which matches ₹ U+20B9 INDIAN RUPEE SIGN.
Quickly toggling emoji mode on and off
When “☑️ Unicode symbols and emoji predictions” is enabled, finding matching candidates can be considerably slower compared to when emoji mode is switched off. Especially if the emoji lookup is done in multiple languages at the same time. In this case, there may be a noticeable delay until the candidate list pops up.
Therefore, “☐ Unicode symbols and emoji predictions” is disabled by default to show normal word predictions with maximum speed.
Always opening the setup tool to switch emoji mode on if one occasionally wants to input an emoji would be inconvenient. Therefore, emoji mode can also be toggled with a mouse binding (Control+Button3 anywhere in the candidate list toogles emoji mode between on and off) or with a key binding (AltGr+F6 toggles emoji mode between on and off).
But there is an even faster way to temporarily switch on emoji mode just for the current lookup.
In the example video we can see that there is an option:
“Emoji trigger characters: [_: ]”
By default, the value for this option contains only the underscore “_”, for this video I have added a colon “:”.
Even if emoji mode is off (which can be seen in the options tab of the setup tool also shown in the video) we get emoji matches by starting or ending keywords with “_” or “:”.
As can be seen in the video, “camel_”, “:frog”, “_India”, “:castle”, “rocket:”, “:cat_heart” match emoji even though “☐ Unicode symbols and emoji predictions” is disabled
⚠️ Concatenating keywords: If you want to use several keywords like in “:cat_heart” always use the underscore to concatenate the keywords like “cat” and “heart”. This is not changed by configuring the “Emoji trigger characters”.
Using these “Emoji trigger characters” at the beginning or end of the search input temporarily turns on emoji search just for this one lookup.
Emoji picker
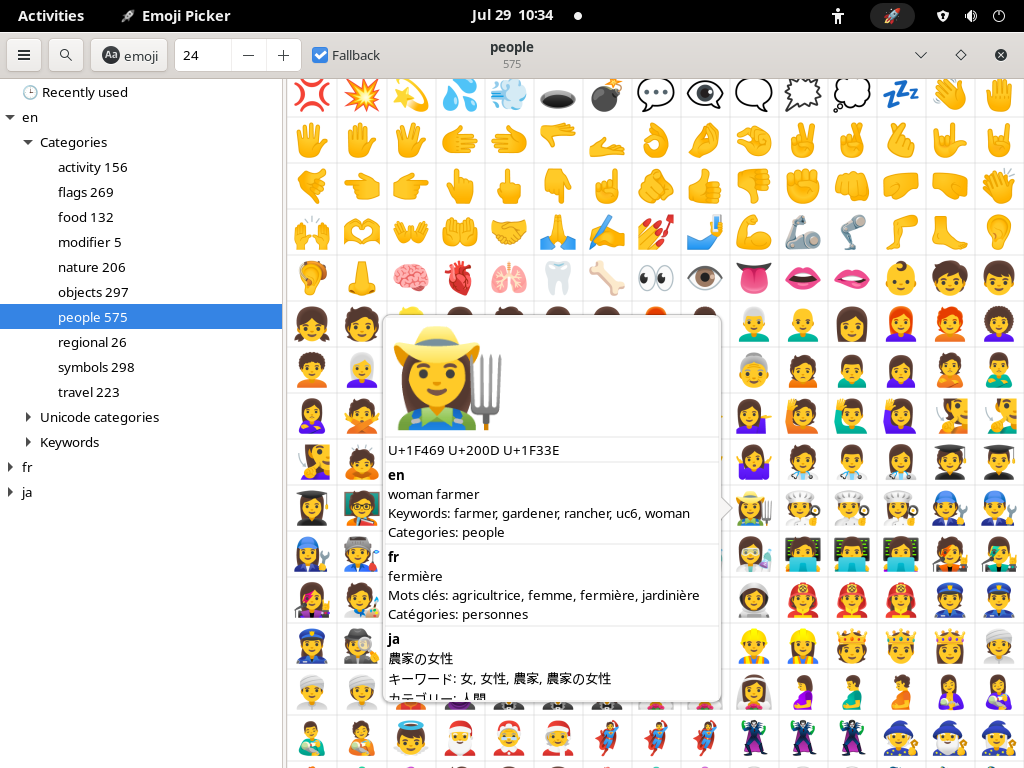
Screenshot of Emoji Picker
ibus-typing-booster contains an “emoji-picker” tool which can be used independently from ibus-typing-booster, i.e. even when ibus-typing-booster is not running.
In Fedora, “emoji-picker” is packaged as sub-package of ibus-typing-booster named “emoji-picker”, so it might not be installed but you can install it with:
$ sudo dnf install emoji-picker
From the command line “emoji-picker” can be started with and optional list of languages:
$ emoji-picker -l en:ja:fr:it:hi:ko:zh &
(The -l option to specifying some languages is optional, see
explanation about the options below).
Clicking with the left mouse button on an emoji shown in “emoji-picker” puts it into the clipboard and you can then paste it somewhere using Control+V or the middle mouse button.
Clicking the right mouse button on an emoji shown in “emoji-picker” shows the emoji much bigger and some extra information about that emoji, like the Unicode code point(s), the name and search keywords of the emoji in all chosen languages, the fonts really used to render this emoji, the Unicode version this emoji first appeared in, and a link to lookup this emoji in emojipedia.
The fonts really used to render an emoji may differ from the font chosen in the user interface of emoji picker because:
The chosen font may have no glyph for a certain emoji. In that case, if there is any other font installed on the system which has that emoji, a fallback font will be used to render the emoji (Unless the “☑️ Fallback” option at the top of emoji-picker is switched off!). The info popover shown on right mouse click will show which font was really used, i.e. it enables one to see which font was used as a fallback.
Some emoji are sequences of several code points and with some fonts (or when there are bugs in the rendering system), it may not be possible to render the sequence correctly and one may see individual parts of the sequence rendered seperately, possibly even different parts of the sequence in different fonts. The info popover shown on right mouse click shows which font was used for which part of the sequence which is helpful to debug such problems.
Emoji can also be selected with different skin tones. If the mouse hovers over an emoji for which different skin tones are available, a tooltip says “Long press or middle click for skin tones”. Long pressing such an emoji with the left mouse button or clicking it with the middle mouse button pops up a menu showing all the skin tone variants. One can then click on any variant with the left mouse button to put it into the clipboard and paste it elsewhere.
Which skin tone was last used is remembered, i.e. the emoji shown before opening the menu for the skin tones is the emoji with the skin tone variant used last for this emoji.
There is also a “🕒 Recently used” section at the top left of “emoji-picker”.
Clearing the recently used characters resets all emoji to neutral skin tone by default.
“emoji-picker” also has a “Search” feature where you can type a search string and get matching emoji listed.
The search string can be in any of the languages specified by the environment variables or on the command line.
In the search results as well you can do the same things as when browsing the emoji categories:
Click on one of the matches to put it into the clipboard and paste it elsewhere.
Right click on one of the matches to show the emoji bigger with extra information
Long press left mouse button or click middle mouse button to show skin tones if available for that emoji.
“emoji-picker” has some command line options to choose the languages, the font and the fontsize. For example,
$ emoji-picker --languages de:en:fr
would enable you to use German, English, and French to browse and
search for emoji and display the names of the emoji in all of these
languages. If the command line option is not used, the languages are
taken from the environment variables. The LANGUAGE variable works as
well. For example,
LANGUAGE=de:en:fr emoji-picker
also chooses German, English, and French. And,
LANG=de_DE.UTF-8 emoji-picker
would choose only German (English is always implicitly added as a fallback though.)
The command line options to choose a different font or font size can be used like this:
emoji-picker --font "Noto Color Emoji" --fontsize 32
The command line font options override the font options in the graphical user interface.
For more about emoji fonts and colour, see Emoji fonts.
Emoji fonts
Good fonts to display emoji:
“Noto Color Emoji”:
On Fedora 40, this font is in the
google-noto-emoji-fontspackage. The version currently packaged is a bitmap font (OpenType CBDT table). When the bitmaps are scaled up to huge sizes the results look blurry.On openSUSE it is in the
noto-coloremoji-fontspackage. The version currently packaged is a bitmap font (OpenType CBDT table). When the bitmaps are scaled up to huge sizes the results look blurry.If the version packaged for your distribution is not up-to-date, you can get the most recent version here: https://www.google.com/get/noto/. (Search for “Noto Color Emoji”).
You can also get this font from the github repo: https://github.com/googlefonts/noto-emoji/tree/main/fonts There is also a Noto-COLRv1.ttf in that directory which uses COLRv1 (it has a OpenType COLR table). COLR fonts use scalable vector graphics and thus render nicely at any size. COLRv1 also renders quite fast, faster than SVG apparently.
“Twitter Color Emoji”:
A color and B&W emoji SVG-OpenType / SVGinOT font (has the OpenType SVG table) I tested that it works well on Fedora 40 and Fedora 41. SVG is a scalable vector graphics format, therefore this font renders nicely at any size. SVG seems to render slower than COLRv1, but this font still renders quite fast.
I am not aware of packages for Fedora or openSUSE but one can easily download the tarball for the latest release from https://github.com/13rac1/twemoji-color-font/releases/download/v15.1.0/TwitterColorEmoji-SVGinOT-Linux-15.1.0.tar.gz and unpack it in the ~/.fonts/ directory.
“Twemoji”:
Homepage: https://twemoji.twitter.com/ (doesn’t exist anymore)
On Fedora, this font is in the
twitter-twemoji-fontspackage. It is a bitmap font (OpenType CBDT table).
“OpenMoji”:
Homepage: https://openmoji.org/
On Fedora 40, this font is in the
hfg-gmuend-openmoji-color-fontspackage. The font in the package is a COLRv1 font (OpenType COLR table), i.e. a vector graphics font which scales nicely to any size. Other varieties of this font can be found in the github repo: https://github.com/hfg-gmuend/openmoji/tree/15.0.0/font There are versions with CBDT (bitmap), COLRv0, COLRv1, SVG, SBIX, SVG and COLRv0, SVG and COLRv1. The SVG rendering works for me on Fedora 40 but is really slow. There is also a black and white verson of this font in that github repo, “OpenMoji-black-glyf.ttf”.
“Symbola”:
Created by George Douros. The latest version (Version 13.00, released March 25, 2020)is available here: https://dn-works.com/ufas/
Distributions usually have packages old version of this font as the recent versions have a licence which does not allow to include it in distributions: “Free use of UFAS is strictly limited to personal use.”
“Symbola” is not really an emoji font, it is a black and white font (not even grayscale) and it doesn’t support emoji sequences, i.e. emoji which consist of mor than one character. That means emoji sequences like 👷 (👷 U+1F477 CONSTRUCTION WORKER, U+200D ZERO WIDTH JOINER, ♀ U+2640 FEMALE SIGN) will display as several glyphs and not as a single glyph showing a female construction worker. The same problem occurs for the flag sequences, the family emoji and all other emoji sequences. And the skin tones modifiers are shown as seperate characters following the emoji they are modifying as well. Nevertheless “Symbola” is a phantastic font and I absolutely recommend to download its latest version and unpack the Symbola.zip file in your
~/.fonts/directory. It has very beautifully drawn symbols, for example mathematical symbols which are just fine in black and white and which most other fonts don’t have.
The following video shows the above mentioned fonts used in “emoji-picker”:
Historic: Showing emoji in colour
Once upon a time it was not possible at all to display colourful emoji using Linux. The best one could get using color emoji fonts like “Noto Color Emoji” were grayscale emojis which looked like this:
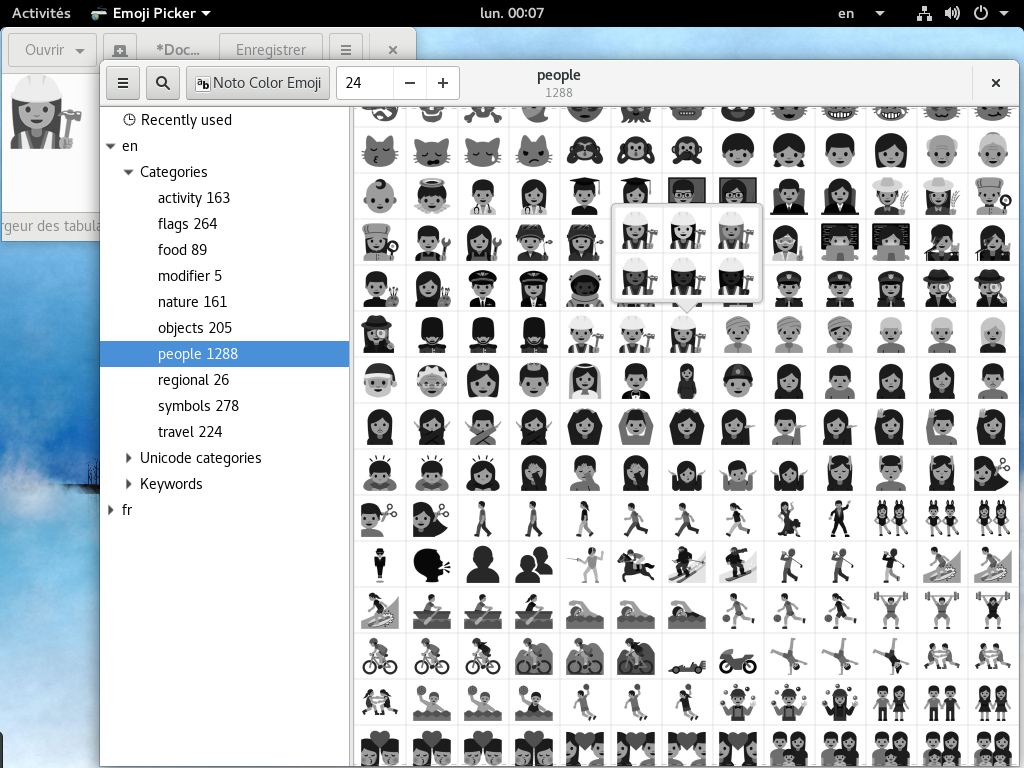
How emoji looked like on Linux before colour became possible
Later one could use an experimental patch for Cairo which enabled colour display of emojis.
On top of that Cairo patch one usually also had to fiddle with the
fontconfig font setup to give a good colour emoji font highest
priority, i.e. create a file ~/.config/fontconfig/fonts.conf with
contents like example fonts.conf to give
the “Noto Color Emoji” the highest priority.
Luckily these times are long gone and as far as I know all recent Linux distributions display nice, colourful emoji by default now.
The Gnome on-screen keyboard, enabling and using it
This video shows how one can enable the Gnome on-screen keyboard and use it with ibus-typing-booster.
To enable the Gnome on-screen keyboard, open the Gnome control center and select the “Accessibility” tab. Scroll down to the “Typing” section and enable the slider “Screen Keyboard”.
If no other accessibility features had already been enabled before, the accessibility icon now appears in the Gnome panel. Clicking on that accessibility icon pops down a menu where you can see that the “Screen Keyboard” is now enabled.
Now focus on some input area, I use gedit in the video.
The on-screen keyboard should now always be visible when the focus is on an input area.
If an ibus input method like ibus-typing-booster is enabled, this input method is used when clicking the keys on the on-screen keyboard.
Without the on-screen keyboard, Typing Booster pops up lists of candidates for completion or shows completions inline if the option “☑️ Use inline completion” is enabled.
When Typing Booster would pop up a candidate list during normal use with a hardware keyboard, this list is shown instead above the keys of the on-screen keyboard.
But when “☑️ Use inline completion” is enabled, Typing Booster
often shows the “best” completion inline and does not pop up a
candidate list. Nothing is displayed above the keys of the on-screen
keyboard in that case because the list of the other completion
candidates is still hidden. When using a hardware keyboard, one can
type Tab to request the list for the other candidates to be
shown. But the on-screen keyboard has no Tab key! Changing this to a
different key in the settings of Typing Booster does not help because
the on-screen keyboard has so few keys, there is no spare, unneeded
key one could use instead of Tab to request a candidate list. So
one should disable the option “☐️ Use inline completion” if one
wants to use Typing Booster with the on-screen keyboard. Unfortunately
Typing Booster has no way to detect whether an on-screen keyboard is
visible or not so it cannot switch that option off automatically.
There are currently many other annoying problems and limitations when using the on-screen keyboard with input methods:
Completely broken when using Gnome on Wayland. See: https://bugzilla.redhat.com/show_bug.cgi?id=2015166.
As can be seen in the video, when a candidate is shown which has more than one word, it is hard to see that it is a single candidate. For example, in the video when
Eis typed, the candidate list shows “English text English E EB EC EM”. The first candidate is actually “English text”, i.e. it is a two word candidate, but that is hard to see. It would be much better if the candidates were rendered into some kind of boxes like those used for the keys of the on-screen keyboard for example. See: https://bugzilla.redhat.com/show_bug.cgi?id=2015978The space above the keys of the on-screen keyboard can only show a small number of candidates. There may be a lot more candidates. But these candidates cannot be accessed. In a “normal” candidate list shown when using a hardware keyboard, one can scroll down to the next page of candidates by either using the
Page_Downkey, click on the arrow down button with the mouse or use the mouse wheel. But none of this is possible with the on-screen keyboard, it has noPage_Downkey, the mouse wheel does nothing, and there are no arrow-buttons to click to show the next page. I think the on-screen keyboard should add buttons with left and right arrows to the left and the right of the horizontal row of candidates to switch between multiple pages of candidates. When using Typing Booster, one can often avoid having to go to the next page of candidates by being more specific and typing a few keys more so that the wanted candidate finally appears in the first page. But with many input methods, especially with Japanese input methods like ibus-anthy or ibus-kkc, being able to go to the next page of candidates is absolutely essential. See: https://bugzilla.redhat.com/show_bug.cgi?id=2016001The candidate list does not disappear when it should. In a situation when a candidate list disappears when using a hardware keyboard, it should also disappear when using the on-screen keyboard. For example, when a candidate is committed, the candidate list should disappear. But on the on-screen keyboard the candidate list stays even after a commit happened. See: https://bugzilla.redhat.com/show_bug.cgi?id=2015149
Using NLTK to find related words
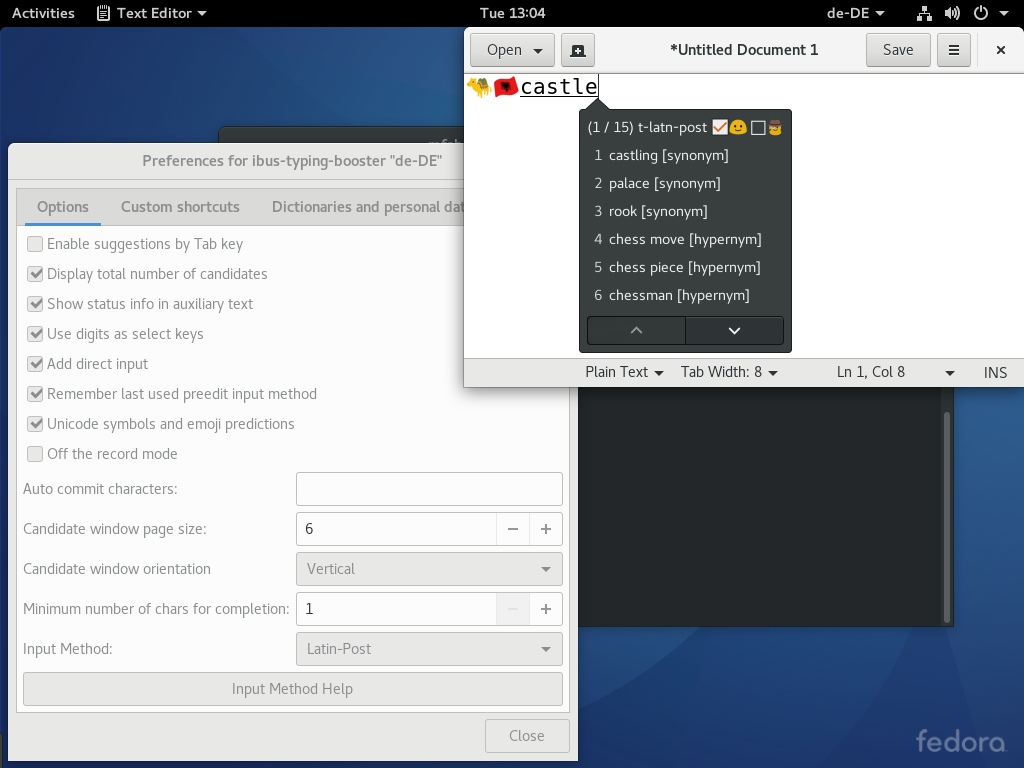
Finding related words for “castle” with NLTK
ibus-typing-booster can also find words which are related to any of the candidates displayed. To show related words for a candidate, move up or down in the candidate list using the arrow-up/arrow-down keys or the page-up/page-down keys until the desired emoji is highlighted, then press AltGr+F12 (When AltGr+F12 is pressed before moving in the candidate list, i.e. when no candidate at all is highlighted in the candidate list, the word from the preëdit is used to lookup related words). In the screen shot shown, “castle” was typed followed by AltGr+F12 and synonyms for “castle” are displayed. hypernyms or hyponyms may also be displayed.
Looking up related words like this currently only works for English. When trying to find related words for non-English words, nothing will happen.
The lookup of related words uses NLTK and will only work when NLTK for Python3 and the wordnet corpus for NLTK are installed. On Fedora, you can install it like this:
sudo dnf install python3-nltk
python3
import nltk
nltk.download()
A download tool for NLTK data as seen in the next screen shot opens, select the wordnet corpus and click the “Download” button:
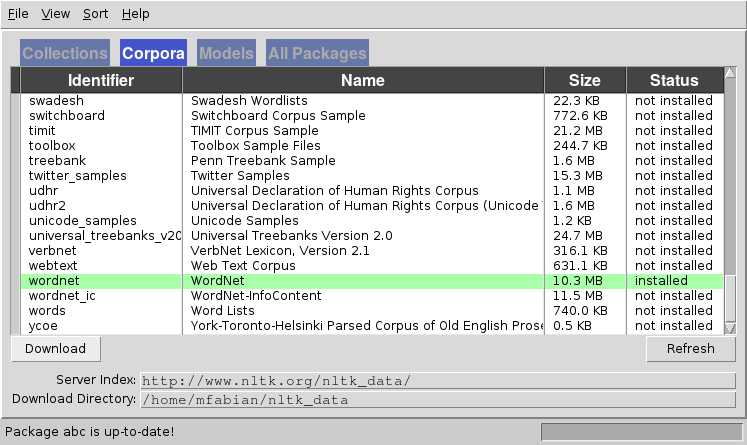
Downloading the Wordnet corpus
Speech recognition
ibus-typing-booster supports speech recognition using the Google Cloud Speech-to-Text service which supports 120 languages.
This service is currently only free for up to 60 minutes per month, when using it for more than 60 minutes per month one has to pay a fee. The pricing is explained here.
To be able to use the Google Cloud Speech-to-Text service, one has to setup a GCP Console project.
The above link explains that one has to do the following things:
- Create or select a project.
- Enable the Google Speech-to-Text API for that project.
- Create a service account.
- Download a private key as a .json file.
The link explaining how to setup a GCP Console project also mentions that one has to install and initialize the Google Cloud SDK. Actually doing that seems to be optional, I tried doing the ibus-typing-booster speech recognition without installing the Google Cloud SDK and it seems to work just fine without.
And one has to install the client library for Python3 . This link explains that you can install the client library with the command
pip install --upgrade google-cloud-speech
⚠️ Attention: on most Linux distributions today, the above line will install the Python2 version of this client library. But ibus-typing-booster requires Python3, so you probably have to use
pip3 install --upgrade google-cloud-speech
to get the Python3 version of the client library (unless on your distribution pip already defaults to Python3 but that is rather unlikely at the moment). You can also add the --user option if you want to install this in the home directory of the user:
pip3 install --user --upgrade google-cloud-speech
And you need to install the Python3 module of pyaudio. How to do that depends on you Linux distribution. On Fedora 29 you can do it with:
sudo dnf install python3-pyaudio
Finally, after the Google setup and the software installation is done, you can enable speech recognition in ibus-typing-booster.
One necessary thing to set up is setting a key binding for speech recognition. By default that key binding is empty, the screen shot shows how to set it to something:
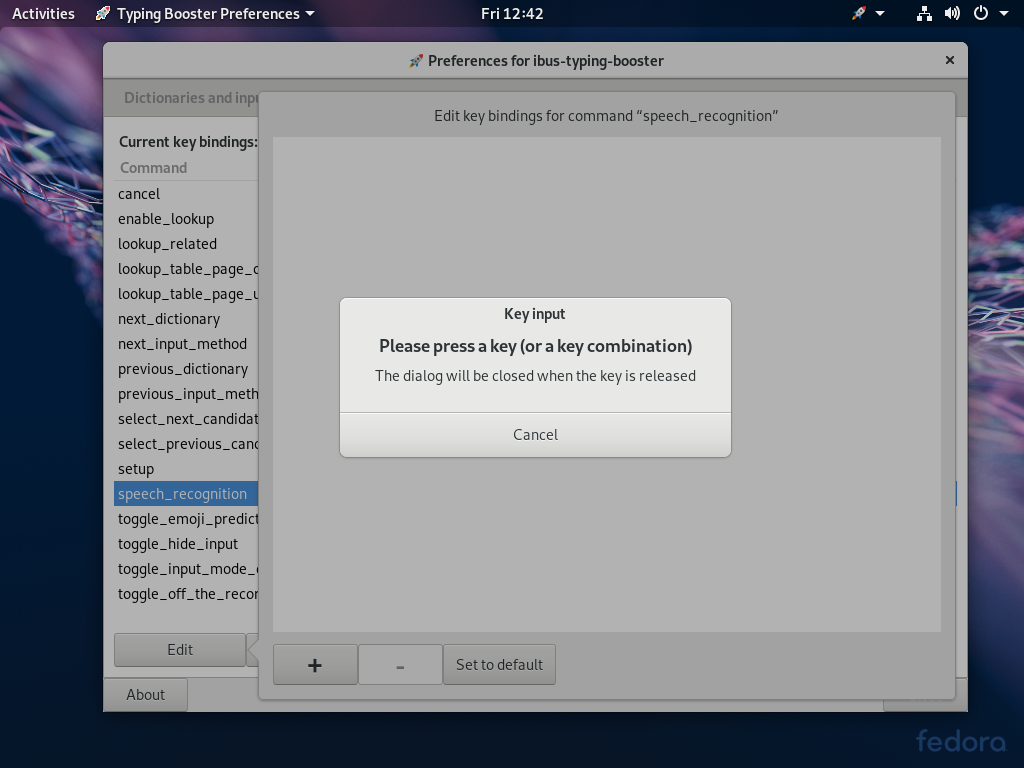
Set a key binding for speech recognition
Another necessary thing to setup is to specify the location of the “Google application credentials” .json file which you should have downloaded above when setting up a GCP Console project.
The screen shot shows that you can do that in the “Speech recognition” tab of the setup tool of ibus-typing-booster:
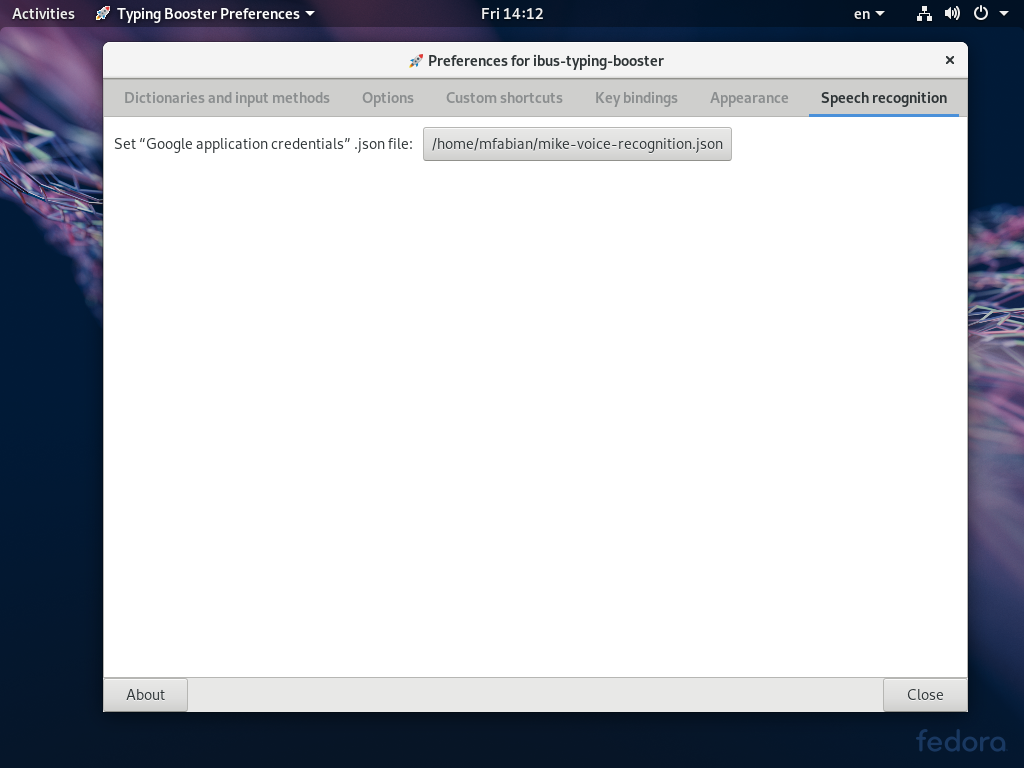
Set the “Google application credentials” .json file
The language used for speech recognition is the language of the dictionary with the highest priority in ibus-typing-booster.
You can see these dictionary priorities by opening the setup tool of ibus-typing-booster and looking at the “Dictionaries and input methods” tab. The dictionary at the top of the list has the highest priority and the language of this dictionary is used for Google Speech-to-Text.
Here you can also see for which languages speech recognition is officially supported. The official list of languages supported by Google Cloud Speech-to-Text is here. In the ibus-typing-booster setup tool “Dictionaries and input methods” tab, a row for a language officially supported by Google Speech-to-Text is marked with “Speech recognition ✔️”, a row for a language not officially supported by Google Speech-to-Text is marked with “Speech recognition ❌”.
In Googles official list, only “de_DE” is supported among the German variants. Therefore, one can see in the screen shot that “de_CH” is marked with “Speech recognition ❌”:

Choose the langauge for speech recognition
But, when I tried it, I found that “de”, “de-DE”, “de-AT”, “de-CH”, “de-BE”, “de-LU” all seem to work the same and seem to recognize standard German. When using “de-CH”, it uses “ß” when spelling German words even though “ss” is used in Switzerland instead of “ß”. There seems to be no difference between using Google Speech-to-Text for all these variants of German.
However, for “en-GB” and “en-US”, there is a difference, the produced text uses British or American spelling depending on which one of these English variants is used.
I don’t want to disallow using something like “de-CH” for speech recognition just because it is not on the list of officially supported languages. Therefore, I allow all languages to be used for speech recognition. But when a language is not officially supported, I mark it with “Speech recognition ❌” and you can try whether it works well or not.
When trying to use a language which is really not supported by Google Speech-to-Text, for example “gsw_CH” (Alemannic German in Switzerland), it seems to fall back to American English, i.e. it behaves as if speech recognition for “en_US” were used.
To switch to a different language for speech recognition you don’t always have to open the setup tool, you can also use key bindings to change the highest priority dictionary, see the commands “next_dictionary” and “previous_dictionary” in the key bindings tab of the setup tool.
And you can also change the highest priority dictionary by using the Gnome panel (or the panel of your favourite desktop) or the ibus floating panel on non-Gnome desktops.
To input using speech recognition, press the key which is bound to the command “speech_recognition”. A popup appears near the writing position showing something like “🎙en_GB 🇬🇧: ”. Now speak something and what Google Speech-to-Text recognizes appears in that popup which then may look like “🎙en_GB 🇬🇧: This is the text I have spoken”. When a pause is detected in the voice recording, the speech recognition is finalized and the result is inserted at the writing position.
⚠️🚧🏗️ AI chat using ollama or ramalama
⚠️🚧🏗️ Experimental Feature: AI Chat (Beta)
To use the AI chat feature, you need:
A running ollama server or ramalama server.
Keybindings for
ai_chat_start_newandai_chat_continue(configure these in the Keybindings tab of the setup tool).
How it works
- Select text to use as your question for the AI.
- Press your assigned keybinding to send it.
Commands
| Command | Behaviour |
|---|---|
ai_chat_start_new | Starts a fresh chat using the selected text as the first question. Discards any prior history. |
ai_chat_continue | Sends the selected text as a follow-up question. Retains message history (RAM-only). |
⚠️ History is cleared after:
- Using
ai_chat_start_new- Restarting Typing Booster
AI response handling
The AI’s answer streams into the auxiliary text. To interrupt streaming:
- Press
Escape(default forcancel) - Switch focus to another window or move the cursor with the mouse.
After the answer completes
| Action | Effect |
|---|---|
Escape (cancel) | Discards the answer and the question (no history recorded). |
| Any other key | Inserts a newline, adds the answer, inserts the keypress, and records the Q&A in history. |
Control + any other key | Replaces the question with the answer, inserts the keypress, and records history. |
Alt + any other key | Discards the answer but keeps the Q&A in history (useful for refining follow-up questions). |
Ollama server setup
Minimum required version: 0.9.6.
Installation notes
- Fedora 42: Packaged version (0.4.4) is outdated.
- Fedora 43: Packaged version (0.9.4) is still too old for most models.
If your distro lacks ollama ≥ 0.9.6 install upstream:
🔗 Official Linux Installation Guide
Steps
Start the server:
ollama serve
(or use systemctl for auto-start: 🔗 Instructions)
Verify installation:
ollama -v
Pull a model (e.g., gemma3):
ollama pull gemma3
Configure Typing Booster:
In the AI tab of the setup tool of Typing Booster you should see:
| ☑️ Enable AI chat | |
|---|---|
| AI server: ℹ️ | http://localhost:11434 : ollama 0.9.6 ✔️ |
| Model: | [ gemma3 ✔️ (gemma3:latest) ] |
| Message history limit: | [ 99 ][ ➕ ][ ➖ ] |
If everything checks out, proceed to AI chat usage.
Ramalama server setup
Fedora 42/43: The packaged ramalama (0.12.2) is sufficient.
Steps
Install:
sudo dnf install ramalama
Pull a model (e.g., gemma3):
ramalama pull gemma3
Start the server:
ramalama serve --network=host -p 11434 gemma3
--network=host: Ensures the OpenAI REST API is accessible (required for Typing Booster).-p 11434: Matches Ollama’s default port. Omit to use port 8080, but then set:
export OLLAMA_HOST=http://localhost:8080
(Add to ~/.profile and restart your session.)
Configure Typing Booster:
In the AI tab of the setup tool of Typing Booster you should see:
| ☑️ Enable AI chat | |
|---|---|
| AI server: ℹ️ | http://localhost:11434 : ramalama 0.12.2 ✔️ |
| Model: | [ gemma3 ✔️ (gemma-3-4b-it-GGUF) ] |
| Message history limit: | [ 99 ][ ➕ ][ ➖ ] |
If everything checks out, proceed to AI chat usage.